- Share on
Ionic and Django: generate your code in few seconds - Part two
June 2020
As i said previously to have our Ionic and Django project generated automatically, we just need to provide a models.py file. So let's go on Ionic and Django kickoff website.
From here we can create an account and choose the appropriate plans that fits our needs.
Once a plan is choosen, we need to answer some questions:
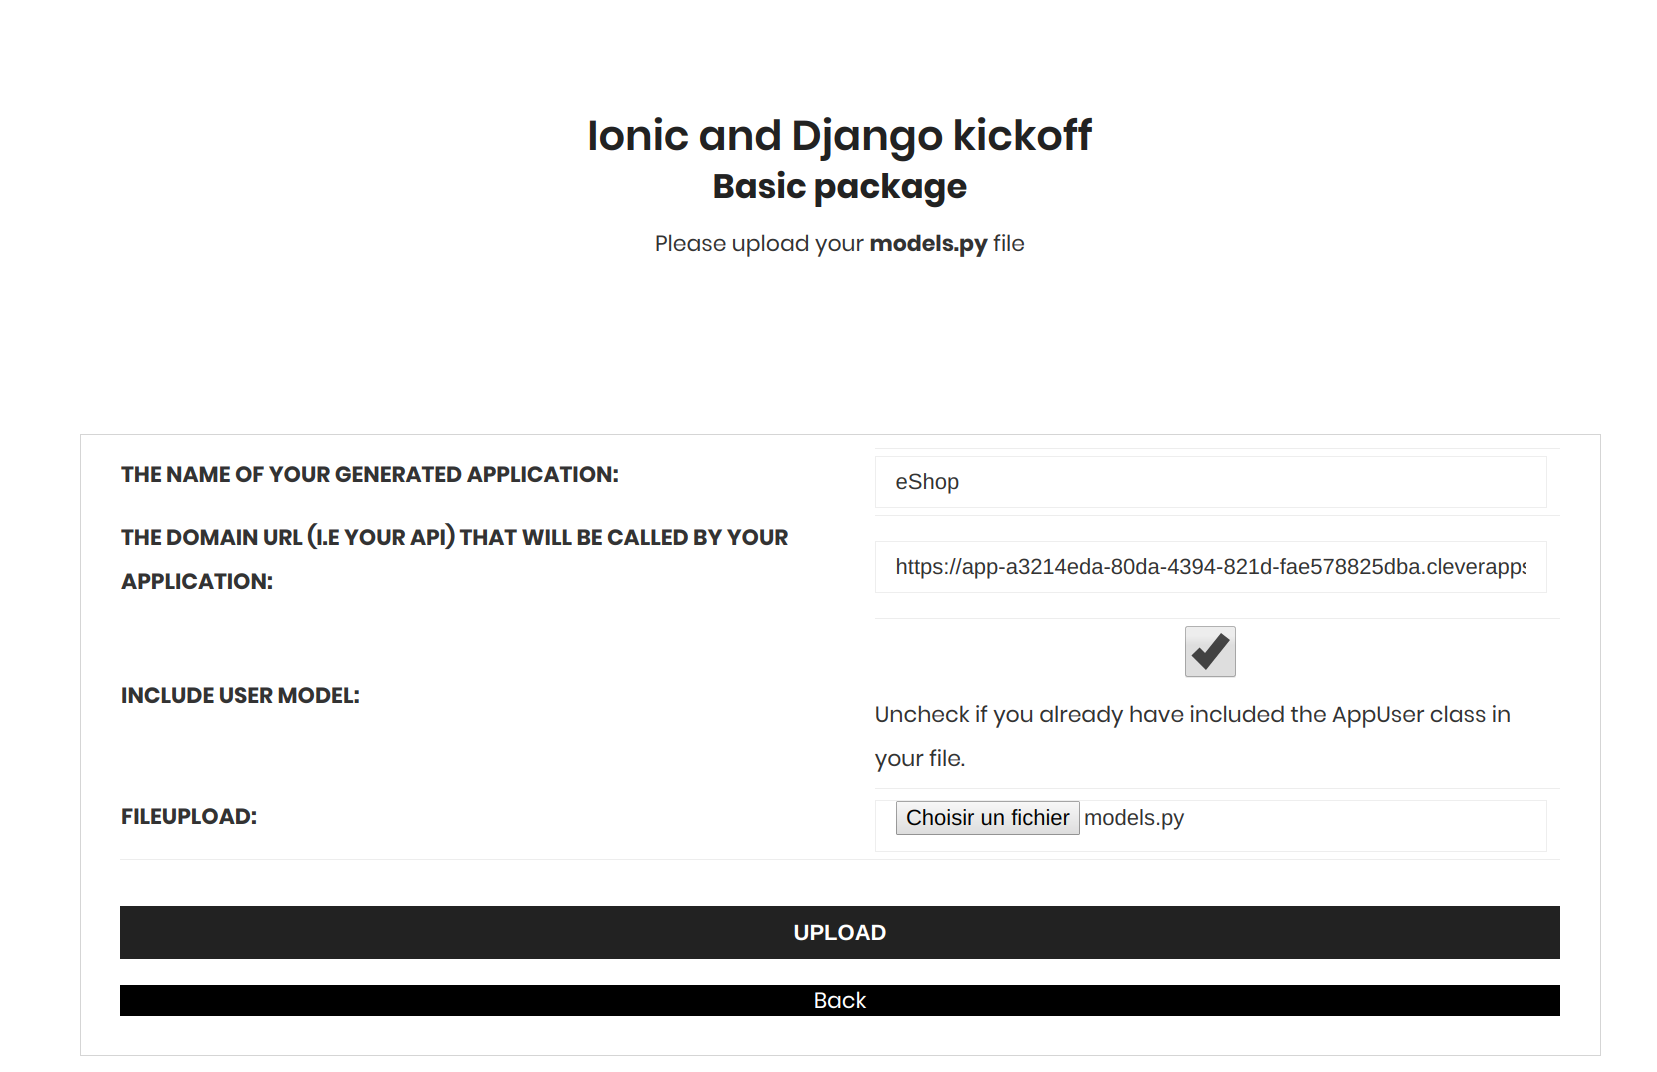
| Name of the application | Your ionic and Django package will be named this value |
| Domain url | The url on which you will deploy the Django project. You can enter http://127.0.0.1:8000 if you run the django server on your machine for development |
| Include user model | As i said on part one, the tool needs to have an AppUser class to generate all the code related to authentification. If you haven't already incluced the AppUser in your models.py file, check this option. |
| Fileupload | Just browse to select your models.py file in your disk |
After few seconds if everything goes right and your models.py doesn't include errors, we receive and email with a download link to our generated package named ionicdjangokickoff_package.zip
If an error occurs, i will receive an email to investigate and check your models.py file.
The extracted zip will contain a directory named with the value choosen in the previous form : eShop.
This directory itself will contain two directories : Backend for Django code and Frontend for the Ionic code.
Let's focus on the Django directory first.
Django generated code and how to deploy on the cloud
The Backend directory contains our Django project. The most important directories are api which contains the endpoints our Ionic application will use to get data, and a bo directory containing the models.py file and the admin.py file for our backoffice interface (silver and gold packages only).
API generated
The api directory contains an urls.py file with all endpoints available
A serializers.py file with all entities serializers and a views.py file with all methods for our entities.
List of endpoints generated:
urlpatterns = [
  url(r'^news/(?P<pk>[0-9A-Fa-f-]+)/$', NewsDetailView.as_view()),
  url(r'^news/$', NewsListView.as_view()),
  url(r'^appuser/(?P<pk>[0-9A-Fa-f-]+)/$', AppUserDetailView.as_view()),
  url(r'^appuser/$', AppUserListView.as_view()),
  url(r'^shop/(?P<pk>[0-9A-Fa-f-]+)/$', ShopDetailView.as_view()),
  url(r'^shop/$', ShopListView.as_view()),
  url(r'^shopopeninghours/(?P<pk>[0-9A-Fa-f-]+)/$', ShopOpeningHoursDetailView.as_view()),
  url(r'^shopopeninghours/$', ShopOpeningHoursListView.as_view()),
  url(r'^shopclosingrules/(?P<pk>[0-9A-Fa-f-]+)/$', ShopClosingRulesDetailView.as_view()),
  url(r'^shopclosingrules/$', ShopClosingRulesListView.as_view()),
  url(r'^category/(?P<pk>[0-9A-Fa-f-]+)/$', CategoryDetailView.as_view()),
  url(r'^category/$', CategoryListView.as_view()),
  url(r'^product/(?P<pk>[0-9A-Fa-f-]+)/$', ProductDetailView.as_view()),
  url(r'^product/$', ProductListView.as_view()),
  url(r'^order/(?P<pk>[0-9A-Fa-f-]+)/$', OrderDetailView.as_view()),
  url(r'^order/$', OrderListView.as_view()),
  url(r'^orderproduct/(?P<pk>[0-9A-Fa-f-]+)/$', OrderProductDetailView.as_view()),
  url(r'^orderproduct/$', OrderProductListView.as_view()),
]
We can see that for each entity declared in the models.py file that we uploaded, two urls have been generated. The fisrt one to get existing objects (or create) and the second one to get,update,delete entity.
To learn more about Django Rest framework API you can read this tutorial
For each entity it is possible to filter by fields name specified in the class of your model. If we look at the code generated for our AppUser
class AppUserListView(generics.ListCreateAPIView):
    permission_classes = [permissions.IsAuthenticated]
    queryset = AppUser.objects.all()
    serializer_class = AppUserSerializer
    filterset_fields = ['id','email','password','userName','firstName','lastName','pushToken','facebookToken','googleToken','appleToken','online','lastConnexionDate','valid','stripeCustomerId','stripePaymentMethodId','connectionType','createdAt','updatedAt']
we can see the instruction filterset_fields with the fields declared.
The API generated is protected using oAuth2 so before being able to call API and get data, we need to configure oAuth2. Please refer to this tutorial to learn more about this.
Deploy using Clever cloud
Before deploying the django project on cloud, we can test it locally. First, we create a virtual environment, activate it and install requirements
 virtualenv -p python3 venv
 source venv/bin/activate
 pip install -r requirements.txt
then we can try to run it
python manage runserverAn error occured because the generated code is configure to use a PostgreSQL database, and try to get it's configuration using environment variables
POSTGRESQL_ADDON_URI = os.getenv("POSTGRESQL_ADDON_URI")
POSTGRESQL_ADDON_PORT = os.getenv("POSTGRESQL_ADDON_PORT")
POSTGRESQL_ADDON_HOST = os.getenv("POSTGRESQL_ADDON_HOST")
POSTGRESQL_ADDON_DB = os.getenv("POSTGRESQL_ADDON_DB")
POSTGRESQL_ADDON_PASSWORD = os.getenv("POSTGRESQL_ADDON_PASSWORD")
POSTGRESQL_ADDON_USER = os.getenv("POSTGRESQL_ADDON_USER")
DATABASES = {
    'default': {
        'ENGINE': 'django.contrib.gis.db.backends.postgis', #''django.db.backends.postgresql_psycopg2',  #'django.db.backends.mysql',
        'NAME': POSTGRESQL_ADDON_DB,
        'USER': POSTGRESQL_ADDON_USER,
        'PASSWORD': POSTGRESQL_ADDON_PASSWORD,
        'HOST': POSTGRESQL_ADDON_HOST,
        'PORT': POSTGRESQL_ADDON_PORT,
        'CONN_MAX_AGE': 1200,
    }
}
We can change the configuration of the settings.py file to use an SQLite database
DATABASES = {
    'default': {
        'ENGINE': 'django.db.backends.sqlite3',
        'NAME': 'base.sqlite3',
        'USER': '',
        'PASSWORD': '',
        'HOST': '',
        'PORT': '',
    },
}
and now then we can run it
python manage runserverWe need to run migrate command and create superuser if we want to access the admin interface
python manage.py migrate
python manage createsuperuser
The admin interface can be access at the url : http://127.0.0.1:8000/backoffice
With basic package, we can only see Groups and Users and the oAuth2 tables, whereas on silver or gold package, we will be able to see all entities tables.
Ok let's deploy on the cloud now. First replace the SQLite database configuration just added with the initial one
POSTGRESQL_ADDON_URI = os.getenv("POSTGRESQL_ADDON_URI")
POSTGRESQL_ADDON_PORT = os.getenv("POSTGRESQL_ADDON_PORT")
POSTGRESQL_ADDON_HOST = os.getenv("POSTGRESQL_ADDON_HOST")
POSTGRESQL_ADDON_DB = os.getenv("POSTGRESQL_ADDON_DB")
POSTGRESQL_ADDON_PASSWORD = os.getenv("POSTGRESQL_ADDON_PASSWORD")
POSTGRESQL_ADDON_USER = os.getenv("POSTGRESQL_ADDON_USER")
DATABASES = {
    'default': {
        'ENGINE': 'django.contrib.gis.db.backends.postgis', #''django.db.backends.postgresql_psycopg2',  #'django.db.backends.mysql',
        'NAME': POSTGRESQL_ADDON_DB,
        'USER': POSTGRESQL_ADDON_USER,
        'PASSWORD': POSTGRESQL_ADDON_PASSWORD,
        'HOST': POSTGRESQL_ADDON_HOST,
        'PORT': POSTGRESQL_ADDON_PORT,
        'CONN_MAX_AGE': 1200,
    }
}
We can also remove the virtualenv directory created before.
rm -rf venv/To learn more on Clever cloud and how to deploy on it, you can read this tutorial
Once you have created and configured your instance on clever cloud, you can clone the repository, copy all the generated django code into it, and then push to git. It will automatically deploy your code.
Once deploy into the cloud, we need to create our django tables, superuser...
virtualenv -p python3 venv
source venv/bin/activate
pip install -r requirements.txt
As explain in the tutorial, i create a file named varEnv.txt to expose my environment variables
export STATIC_URL_PREFIX=/static
export POSTGRESQL_ADDON_URI=postgresql://ui0kck4h75hl0wsm8ijp:EB6c1xjo08hTL9uE2Lpc@blkiyofetjnb4th7lota-postgresql.services.clever-cloud.com:5432/blkiyofetjnb4th7lota
export POSTGRESQL_ADDON_PORT=5432
export POSTGRESQL_ADDON_HOST=blkiyofetjnb4th7lota-postgresql.services.clever-cloud.com
export POSTGRESQL_ADDON_DB=blkiyofetjnb4th7lota
export POSTGRESQL_ADDON_USER=ui0kck4h75hl0wsm8ijp
export POSTGRESQL_ADDON_PASSWORD=EB6c1xjo08hTL9uE2Lpc
export DEBUG=True
export ENVIRONNEMENT=DEV
Then after sourcing the file
. varEnv.txtwe can run migrations and create our superuser to access the admin
python manage.py migrate
python manage.py createsuperuser
Don't forget to collect static files if you run django on production mode : python manage.py collectstatic , commit and push to deploy again
Now we can access the admin interface with the domain name provided by Clevercloud which is for me:
https://app-a3214eda-80da-4394-821d-fae578825dba.cleverapps.io/backoffice/Configure oAuth2 to use API
As i said previously, the API is protected so we need to create and configure it.
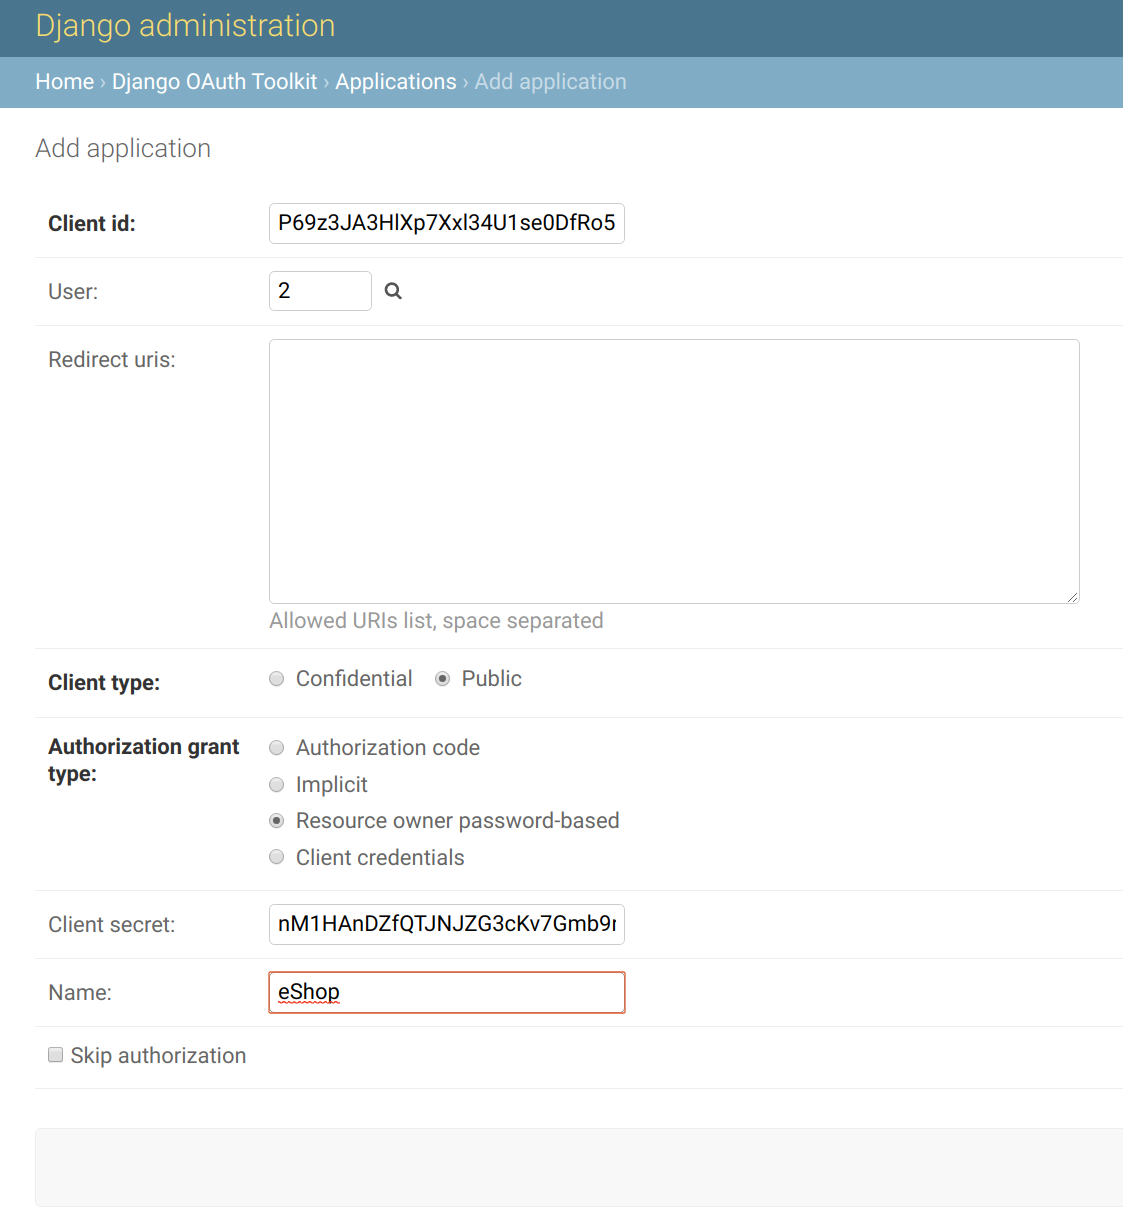
Once again please refer to this tutorial to learn more about.
Call API
Ok now i should be able to make some API calls. Let's try to obtain a token
curl -X POST \
  https://app-a3214eda-80da-4394-821d-fae578825dba.cleverapps.io/o/token/ \
  -H 'Content-Type: application/x-www-form-urlencoded' \
  -H 'Postman-Token: 059a3664-2e02-48d6-ba47-e19cc41f7b91' \
  -H 'cache-control: no-cache' \
  -d 'grant_type=password&username=appmobile&password=appeshop&client_id=P69z3JA3HlXp7Xxl34U1se0DfRo5XxAJl9gEYtEm&client_secret=nM1HAnDZfQTJNJZG3cKv7Gmb9r2WHxh1jfvGDkPFnSHXEwe5S9B3nr4bxhRGoD5mrDIsF0nG8XlWKrzuoG8yKiW7lzC05i2xJ2PYctXTDKd41xBOO9FNPlVAFJs80Hzt'
As response i receive:
{"access_token": "Rq7iRtfAbiae3SOaGYmchjrsZSkPQo", "expires_in": 691200, "token_type": "Bearer", "scope": "read write groups", "refresh_token": "TwPbKoCQpev8JCFr2fc5y5bAYNGg9K"}Notice: Replace username,password, client_id and client_secret by your own values...
Ok at this point, our Django backend is deployed and ready to use without writing a single line of code ! We can now switch to our Ionic application