
Create a chat application with Ionic 5/ Angular 12/ Capacitor 3 and Django 3 – Series – Part four
Day 4 : Ionic application
Create our Ionic project skeleton
To create our Ionic application project just open a terminal and type:
ionic start ChatTuto sidemenu --capacitor --project-id=chattuto --package-id=com.idevotion.chattutoAnd pick the Angular framework. Then since we will deploy our application to iOS and Android , we will add these platforms with Capacitor
npm install @capacitor/iosI will suppose that you have already setup your environment for using Ionic. If not you will find the how to do it here.
The source are generated into a folder named chattuto so we can go inside this folder
cd chattutoNow we will create some empty folders into the src/app directory to better organised our code.
mkdir src/app/pages src/app/models src/app/services| Directory | Definition |
|---|---|
| pages | Will contain our application pages (views) |
| models | Will contain our entity models |
| services | Will contain our services |
Adding a service to dialog with our Backend
Because we will need to dialog with our Backend to get or send data, we will add a service file for this with some other useful methods.
ionic g service ApiService
mv src/app/api-service.service.* src/app/services
And we will move the generated file into our services directory. Next we will install two Capacitor libraries to deal with Network and Storage:
npm install @capacitor/storage @capacitor/networkThen we will write some common and useful methods into our api-service.service.ts file.
You can refer to comment in the code to understand the purpose of methods
import { Injectable } from '@angular/core';
import { HttpClient, HttpHeaders, HttpParams, HttpErrorResponse } from '@angular/common/http';
import { Observable, BehaviorSubject } from 'rxjs';
import { from, of, forkJoin } from 'rxjs';
import { catchError, retry, map, tap } from 'rxjs/operators';
import { AlertController, LoadingController } from '@ionic/angular';
import { Platform } from '@ionic/angular';
import { Storage } from '@capacitor/storage';
import { Network } from '@capacitor/network';

export const domainConfig = {
  client: 'chattuto',
  virtual_host: 'http://127.0.0.1:8000/',
  domainApp: 'http://127.0.0.1:8000/',
  staticStorage: "static/storage/"
}

export enum ConnectionStatus {
  Online,
  Offline
}

@Injectable({
  providedIn: 'root'
})
export class ApiserviceService {

  public status: BehaviorSubject<ConnectionStatus> = new BehaviorSubject(ConnectionStatus.Offline);
  public tokenSet: BehaviorSubject<Boolean> = new BehaviorSubject<Boolean>(false);

  public tokenSSO: String = "";
  networkConnected: boolean = true;
  virtualHostName: string = ''
  appName: string = '';
  apiPrefix = "/api"
  loader: any;
  isShowingLoader = false;

  // ================ AUTHENTIFICATION METHODS ====================
  getLoginUrl: string = ""

  getResetPwdUrl: string = "";
  getRefreshTokenUrl: string = ""
  getMeUrl: string = ""

  getUserUrl: string = '';
  getCreateUserUrl: string = '';

  initProvider(url, app_name, apiPrefix) {
    this.virtualHostName = url;
    this.appName = app_name;
    this.apiPrefix = apiPrefix;
    console.log("init provider appName " + this.appName);
    this.initUrls()
  }

  private initUrls() {
    // ================ AUTHENTIFICATION METHODS ====================
    this.getLoginUrl = this.virtualHostName + "auth/jwt/create/"
    this.getCreateUserUrl = this.virtualHostName + "auth/users/"
    this.getResetPwdUrl = this.virtualHostName + "auth/users/reset_password/"
    this.getRefreshTokenUrl = this.virtualHostName + "auth/jwt/refresh/"
    this.getMeUrl = this.virtualHostName + "auth/users/me/"
    // =================================================================

    this.getUserUrl = this.virtualHostName + this.apiPrefix + "/user/"
  }

  constructor(public http: HttpClient,
    public loadingController: LoadingController,
    public alertCtrl: AlertController,
    public platform: Platform) {

    this.initializeNetworkEvents();
    this.initProvider(domainConfig.virtual_host, domainConfig.client, "api")
    this.http = http
  }

  /**
   * This method will check network events and if a change occurs will store the current network status
   */
  public async initializeNetworkEvents() {
    console.log("======== Initialise Network Events ======")
    if (this.platform.is("capacitor")) {
      let status = await Network.getStatus();
      if (status["connected"] == false) {
        this.networkConnected = false
        this.updateNetworkStatus(ConnectionStatus.Offline);
      }
      else {
        this.networkConnected = true;
        this.updateNetworkStatus(ConnectionStatus.Online);
      }
      let handler = Network.addListener('networkStatusChange', (status) => {
        console.log("Network status changed", status);
        if (status["connected"] == false) {
          this.networkConnected = false
          this.updateNetworkStatus(ConnectionStatus.Offline);
        }
        else {
          this.networkConnected = true;
          this.updateNetworkStatus(ConnectionStatus.Online);
        }
      });
    }
    else {
      if (navigator.onLine) {
        this.updateNetworkStatus(ConnectionStatus.Online);
      }
      else {
        this.updateNetworkStatus(ConnectionStatus.Offline);
      }
    }
  }

  private async updateNetworkStatus(status: ConnectionStatus) {
    this.status.next(status);
    this.networkConnected = status == ConnectionStatus.Offline ? false : true;
    console.log("networkConnected " + this.networkConnected)
  }

  public onNetworkChange(): Observable<ConnectionStatus> {
    return this.status.asObservable();
  }

  public getCurrentNetworkStatus(): ConnectionStatus {
    return this.status.getValue();
  }

  // Store data (as json) with provided key name
  public setLocalData(key, jsonData) {
    return new Promise(async resolve => {
      await Storage.set({ key: <code>${domainConfig.client}-${key}</code>, value: JSON.stringify(jsonData) })
      resolve(true)

    });
  }

  // Remove local data for a specific key
  public removeLocalData(key) {
    return new Promise(async resolve => {
      let ret = await Storage.remove({ key: <code>${domainConfig.client}-${key}</code> })

    });
  }

  // Get local data for a specific key
  public getLocalData(key) {
    return new Promise(async resolve => {
      let ret = await Storage.get({ key: <code>${domainConfig.client}-${key}</code> })

      if (ret.value) {
        resolve(JSON.parse(ret.value))
      }
      else {
        resolve(null)
      }
    });
  }

  //========= Useful methods =========
  // show a No network alert

  async showNoNetwork() {
    let alert = await this.alertCtrl.create({
      header: 'Sorry',
      message: 'No network detected, please check your connexion',
      buttons: ['OK']
    });
    return await alert.present();

  }

  // Show a loader
  async showLoading() {
    if (!this.isShowingLoader) {
      this.isShowingLoader = true
      this.loader = await this.loadingController.create({
        message: 'Merci de patienter',
        duration: 4000
      });
      return await this.loader.present();

    }

  }

  //Dismiss loader
  async stopLoading() {
   if (this.loader) {
      this.loader.dismiss()
      this.loader = null
      this.isShowingLoader = false
    }

  }

  // Show a loader with a specific message
  public async showLoadingMessage(message) {
    this.loader = await this.loadingController.create({
      message: message,
    });
    this.loader.present();
  }

  // Show an error message
  async showError(text) {
    let alert = await this.alertCtrl.create({
      header: 'Error',
      message: text,
      buttons: ['OK']
    });
    return await alert.present();
  }

  /**
  * Show a message
  *
  * @param title - The title of the message to show
  * @param message - The text of the message to show
  *
  */
  async showMessage(title, message) {
    let alert = await this.alertCtrl.create({
      header: title,
      message: message,
      buttons: ['OK']
    });
    return await alert.present();
  }

  // ================ JWT AUTHENTIFICATION METHODS ====================

  /**
   * This method is used to obtain a new access token using the refresh token value
   * @param refreshToken
   * @returns
   */
  refreshToken(refreshToken) {
    const options = {
      headers: new HttpHeaders({
        'Content-Type': 'application/json'
      })
    };

    let params = {
      "refresh": refreshToken
    }
    console.log("=== ask new access token with refresh token ", params)
    return this.http.post(this.getRefreshTokenUrl, params, options).pipe(
      tap(response => {
        console.log("=== REFRESH response", response)
        this.setLocalData("access", { "access": response["access"] })
        this.setLocalData("refresh", { "refresh": response["refresh"] })

      })
    );
  }

}
We will use these methods later while implementing our application pages.
Creating a Register page
The first step for our application, will be to create a page on which our users will be able to register. Let’s do it and create that page. In a terminal, launch the command:
ionic g page RegisterPageThen move generated code to our pages directory
mv src/app/register-page src/app/pages Then we need to edit the app-routing.module.ts to reflect the new path of our page:
  {
    path: 'register-page',
    loadChildren: ()
        => import('./pages/register-page/register-page.module').then( m => m.RegisterPagePageModule)
  }
Because we will not use the default ionic generated pages we will erase the folder named folder and will remove reference of it from the app-routing.module.ts file which should look like this:
  import { NgModule } from '@angular/core';
import { PreloadAllModules, RouterModule, Routes } from '@angular/router';

const routes: Routes = [
  {
    path: 'register-page',
    loadChildren: () => import('./pages/register-page/register-page.module').then( m => m.RegisterPagePageModule)
  }
];

@NgModule({
  imports: [
    RouterModule.forRoot(routes, { preloadingStrategy: PreloadAllModules })
  ],
  exports: [RouterModule]
})
export class AppRoutingModule {}
Adding a form to register
First we will focus on the design of the page. Basically it will be a form asking our user his last name, first name, email and password.
Let’s edit the src/pages/register-page/register-page.page.html and add the following code:
<ion-content color="medium" padding padding-24>
  <div class="auth-container">

    <div class="form">

      <div class="form-title">
        Register
      </div>
        <p *ngIf="submitAttempt" style="color: #ea6153;">Please filled all fields correctly</p>

      <form [formGroup]="userForm">

      <ion-list lines="none" mode="ios" login-form>
         <ion-item>
             <ion-icon class="sw-user-solid" slot="start"></ion-icon>
            <ion-input formControlName="firstName" placeholder="LastName" type="text" [class.invalid]="!userForm.controls.firstName.valid && (userForm.controls.firstName.dirty || submitAttempt)"></ion-input>
          </ion-item>
           <ion-item *ngIf="!userForm.controls.firstName.valid  && (userForm.controls.firstName.dirty || submitAttempt)">
              <p>3 characters min.</p>
          </ion-item>
        <ion-item mode="ios">
          <ion-icon class="sw-user-solid" slot="start"></ion-icon>
           <ion-input formControlName="lastName" type="text" placeholder="FirstName" [class.invalid]="!userForm.controls.lastName.valid && (userForm.controls.lastName.dirty || submitAttempt)"></ion-input>
        </ion-item>
          <ion-item *ngIf="!userForm.controls.lastName.valid  && (userForm.controls.lastName.dirty || submitAttempt)">
              <p>3 characters min.</p>
          </ion-item>
        <ion-item mode="ios">
          <ion-icon class="sw-email-solid" slot="start"></ion-icon>
          <ion-input mode="ios" type="email" placeholder="Email"  name="email" formControlName="email" [class.invalid]="!userForm.controls.email.valid && (userForm.controls.email.dirty || submitAttempt)"></ion-input>
        </ion-item>
         <ion-item *ngIf="((!userForm.controls.email.valid  && (userForm.controls.email.dirty || submitAttempt))">
              <p>An email is required
              </p>
          </ion-item>

        <ion-item mode="ios">
          <ion-icon class="sw-lock-sold" slot="start"></ion-icon>
          <ion-input mode="ios" type="password"  placeholder="Password" formControlName="password" [class.invalid]="!userForm.controls.password.valid && (userForm.controls.password.dirty || submitAttempt)"></ion-input>
        </ion-item>
         <ion-item *ngIf="!userForm.controls.password.valid  && (userForm.controls.password.dirty || submitAttempt)">
              <p>min. 8 characters required with lowercase, uppercase, number and special character</p>
          </ion-item>
        <ion-item mode="ios">
          <ion-icon class="sw-lock-sold" slot="start"></ion-icon>
          <ion-input mode="ios" type="password"   placeholder="Confirm password"  formControlName="confirmpassword" [class.invalid]="!userForm.controls.confirmpassword.valid && (userForm.controls.confirmpassword.dirty || submitAttempt)"></ion-input>
        </ion-item>
           <ion-item *ngIf="!userForm.controls.confirmpassword.valid  && (userForm.controls.confirmpassword.dirty || submitAttempt)">
              <p>Please confirm password</p>
          </ion-item>
      </ion-list>
      <ion-button mode="ios" expand="block" color="danger" [disabled]="!userForm.valid" (click)="register()">
        Create account
      </ion-button>

      </form>
      <p class="instruction" (click)="cgu()">By registering you are accepting our terms and conditions</p>
    </div>
  </div>

</ion-content>

<ion-footer no-border mode="ios" auth>
  <ion-toolbar color="medium" mode="ios" text-center>
    <div class="option-auth">
      <p>Already a member ?</p>
      <ion-button fill="clear" expand="block" routerLink="/login" mode="ios" color="danger">Sign in</ion-button>
    </div>
  </ion-toolbar>
</ion-footer>
Our form will contain some validation methods to check if values entered are in correct format. We will see in a moment how to specify this. But before that let’s edit the src/pages/register-page/register-page.page.scss file to focus on CSS design and add the following code:
p {
    font-size: 0.8em;
    color: red;
}

.option-auth{
    display: flex;
    flex-direction: column;
    align-items: center;
}
We use Flex to center the items in our view, and we set the color of p html tag to be red, because it will be used to display validation error messages.
Now we will define some global CSS style for our Ionic project.
First we can edit the autogenerated file src/app/theme/variables.scss and type:
// Ionic Variables and Theming. For more info, please see:
// http://ionicframework.com/docs/theming/

/** Ionic CSS Variables **/
:root {
  /** primary **/
  --ion-color-primary: #3880ff;
  --ion-color-primary-rgb: 56, 128, 255;
  --ion-color-primary-contrast: #ffffff;
  --ion-color-primary-contrast-rgb: 255, 255, 255;
  --ion-color-primary-shade: #3171e0;
  --ion-color-primary-tint: #4c8dff;

  /** secondary **/
  --ion-color-secondary: #0cd1e8;
  --ion-color-secondary-rgb: 12, 209, 232;
  --ion-color-secondary-contrast: #ffffff;
  --ion-color-secondary-contrast-rgb: 255, 255, 255;
  --ion-color-secondary-shade: #0bb8cc;
  --ion-color-secondary-tint: #24d6ea;

  /** tertiary **/
  --ion-color-tertiary: #005B82;
  --ion-color-tertiary-rgb: 0, 91, 130;
  --ion-color-tertiary-contrast: #ffffff;
  --ion-color-tertiary-contrast-rgb: 255, 255, 255;
  --ion-color-tertiary-shade: #004968;
  --ion-color-tertiary-tint: #337c9b;

  /** success **/
  --ion-color-success: #10dc60;
  --ion-color-success-rgb: 16, 220, 96;
  --ion-color-success-contrast: #ffffff;
  --ion-color-success-contrast-rgb: 255, 255, 255;
  --ion-color-success-shade: #0ec254;
  --ion-color-success-tint: #28e070;

  /** warning **/
  --ion-color-warning: #FFE482;
  --ion-color-warning-rgb: 255, 228, 130;
  --ion-color-warning-contrast: #D93025;
  --ion-color-warning-contrast-rgb: 217, 48, 37;
  --ion-color-warning-shade: #e6cd75;
  --ion-color-warning-tint: #ffe99b;

  /** danger **/
  --ion-color-danger: #ff5b61;
  --ion-color-danger-rgb: 255, 91, 97;
  --ion-color-danger-contrast: #ffffff;
  --ion-color-danger-contrast-rgb: 255, 255, 255;
  --ion-color-danger-shade: #cc484c;
  --ion-color-danger-tint: #ff7b7f;

  /** dark **/
  --ion-color-dark: #222428;
  --ion-color-dark-rgb: 34, 34, 34;
  --ion-color-dark-contrast: #ffffff;
  --ion-color-dark-contrast-rgb: 255, 255, 255;
  --ion-color-dark-shade: #1e2023;
  --ion-color-dark-tint: #383a3e;

  /** medium **/
  --ion-color-medium: #f0f0f0;
  --ion-color-medium-rgb: 152, 154, 162;
  --ion-color-medium-contrast: #f0f0f0;
  --ion-color-medium-contrast-rgb: 255, 255, 255;
  --ion-color-medium-shade: #f0f0f0;
  --ion-color-medium-tint: #f0f0f0;

  /** light **/
  --ion-color-light: #f4f5f8;
  --ion-color-light-rgb: 244, 244, 244;
  --ion-color-light-contrast: #AEAEAE;
  --ion-color-light-contrast-rgb: 174, 174, 174;
  --ion-color-light-shade: #d7d8da;
  --ion-color-light-tint: #f5f6f9;

    /** facebook **/
    --ion-color-facebook: #3578E5;
    --ion-color-facebook-rgb: 53, 120, 229;
    --ion-color-facebook-contrast: #ffffff;
    --ion-color-facebook-contrast-rgb: 255, 255, 255;
    --ion-color-facebook-shade: #2a60b7;
    --ion-color-facebook-tint: #5d93ea;

    /** google **/
    --ion-color-google: #D93025;
    --ion-color-google-rgb: 217, 48, 17;
    --ion-color-google-contrast: #ffffff;
    --ion-color-google-contrast-rgb:  255, 255, 255;
    --ion-color-google-shade: #ae261e;
    --ion-color-google-tint: #e15951;

    /** apple **/
    --ion-color-apple: #222428;
    --ion-color-apple-rgb: 34, 34, 34;
    --ion-color-apple-contrast: #ffffff;
    --ion-color-apple-contrast-rgb:  255, 255, 255;
    --ion-color-apple-shade: #1e2023;
    --ion-color-apple-tint: #383a3e;

}

.ion-color-facebook {
  --ion-color-base:  #3578E5;
  --ion-color-base-rgb: 53, 120, 229;
  --ion-color-contrast:  #ffffff;
  --ion-color-contrast-rgb:  255, 255, 255;
  --ion-color-shade: #2a60b7;
  --ion-color-tint: #5d93ea;
}

.ion-color-google {
  --ion-color-base:  #D93025;
  --ion-color-base-rgb: 217, 48, 17;
  --ion-color-contrast:  #ffffff;
  --ion-color-contrast-rgb:  255, 255, 255;
  --ion-color-shade: #ae261e;
  --ion-color-tint: #e15951;
}

.ion-color-apple {
  --ion-color-dark: #222428;
  --ion-color-dark-rgb: 34, 34, 34;
  --ion-color-dark-contrast: #ffffff;
  --ion-color-dark-contrast-rgb: 255, 255, 255;
  --ion-color-dark-shade: #1e2023;
  --ion-color-dark-tint: #383a3e;
}

.ion-color-custombackground {
  --ion-color-dark: #f0f0f0;
  --ion-color-dark-rgb: 240, 240, 240;
  --ion-color-dark-contrast: #f0f0f0;
  --ion-color-dark-contrast-rgb: 240, 240, 240;

}
and global scss style with modifying the src/app/global.scss file:
/*
 * App Global CSS
 * ----------------------------------------------------------------------------
 * Put style rules here that you want to apply globally. These styles are for
 * the entire app and not just one component. Additionally, this file can be
 * used as an entry point to import other CSS/Sass files to be included in the
 * output CSS.
 * For more information on global stylesheets, visit the documentation:
 * https://ionicframework.com/docs/layout/global-stylesheets
 */

/* Core CSS required for Ionic components to work properly */
@import "~@ionic/angular/css/core.css";

/* Basic CSS for apps built with Ionic */
@import "~@ionic/angular/css/normalize.css";
@import "~@ionic/angular/css/structure.css";
@import "~@ionic/angular/css/typography.css";
@import '~@ionic/angular/css/display.css';

/* Optional CSS utils that can be commented out */
@import "~@ionic/angular/css/padding.css";
@import "~@ionic/angular/css/float-elements.css";
@import "~@ionic/angular/css/text-alignment.css";
@import "~@ionic/angular/css/text-transformation.css";
@import "~@ionic/angular/css/flex-utils.css";

// Font
@import url('https://fonts.googleapis.com/css?family=Lato:400,400i,700,900&display=swap');

:root,
.md,
.ios {
    --ion-font-family: 'Lato', sans-serif;
    --ion-danger-gradient-start: #FF5A5F;
    --ion-danger-gradient-end: #FE4D88;
}

ion-title {
    font-size: 26px;
    font-weight: 700;
}
[padding-24] {
    --padding-start: 24px;
    --padding-end: 24px;
    --padding-top: 24px;
    --padding-bottom: 24px;
}

[padding-lr-24] {
    --padding-start: 24px;
    --padding-end: 24px;
}

[padding-lr-16] {
    --padding-start: 16px;
    --padding-end: 16px;
}

ion-button {

    &:not([shape="round"]) {
        --border-radius: 10px;
    }

    font-weight: 700;
    letter-spacing: normal;

    &:not(.button-large) {
        &:not(.button-small) {
            min-height: 44px;
            font-size: 12px;
        }

    }

    &:not(.button-small) {
        &:not(.button-large) {
            min-height: 44px;
            font-size: 12px;
        }

    }

    &.button-large {
        font-size: 16px;
        min-height: 54px;

        ion-icon {
            font-size: 18px;

        }
    }

    &.danger-gradiant {

         --ion-color-base: linear-gradient(135deg, var(--ion-danger-gradient-start) 0%, var(--ion-danger-gradient-end) 100%) !important;
    }
}

.auth-container {
    background-color: #f0f0f0;
    .form {
        background-color: #f0f0f0;
        .logo {
            margin: 8vh 0;
        }
    }

    .form-title {
        font-size: 40px;
        color: var(--ion-color-dark);
        margin-bottom: 24px;
        margin-top: 43px;
    }
}

.instruction {
    text-align: center;
    margin-top: 5vh;
    font-size: 15px;
    color: var(--ion-color-dark)
}

.buttons {
    ion-button {
        margin-top: 24px;
        margin-bottom: 24px;

        ion-icon {
            font-size: 14px;
            margin: 10px;
        }
    }
}

ion-footer {
    &[auth] {
        .option-auth {
            p {
                margin: 0;
                font-size: 15px;
                color: var(--ion-color-dark)
            }

            ion-button {
                font-size: 15px;
                text-transform: none;
                height: 20px;
                margin: 0;
                margin-bottom: 8px;
                min-height: unset;
            }
        }

    }
}

ion-list {
    &[login-form] {
        margin-bottom: 0;
        background-color: #f0f0f0;
        ion-item {
            border-radius: 5px;
            border: 1px solid #E7E9EB;
            margin: 16px 0;

            ion-icon {
                &[slot="start"] {
                    font-size: 20px;
                    color: #707070;
                }
            }
        }
    }
}

.or {
    display: block;
    position: relative;
    text-align: center;
    margin-top: 24px;
    margin-bottom: 24px;

    &:before {
        $lineWidth: 120px;
        width: $lineWidth;
        height: 1px;
        content: "";
        background: #E4E4E4;
        position: absolute;
        left: 50%;
        top: 50%;
        margin-left: -$lineWidth/2;
    }

    span {
        background: #f0f0f0;
        font-size: 14px;
        color: #707070;
        font-weight: 700;
        padding: 0 16px;
        position: relative;
        z-index: 1;
    }
}

.toolbar-logo-back {
    margin-left: -27px;
    text-align: center;

    img {
        max-height: 90px;
        object-fit: contain;
        margin: 0 auto;
    }
}

.toolbar-logo {
    text-align: center;
    color:#f0f0f0;
    img {
        width: 150px;
        object-fit: contain;
        margin: 0 auto;
        margin-top: 20px;
    }
}

.footer-partner {
    padding: 16px 24px;

    ion-button {
        margin-bottom: 16px;
    }

    .partners {
        margin-left: -8px;
        margin-right: -8px;

        .row-partners {
            padding: 8px;
            text-align: center;
            display: flex;
            align-items: center;
            justify-content: space-between;

            img {
                max-width: 58px;
                margin: 0 auto;
            }
        }
    }
}

ion-footer {
    &[onrow] {
        ion-button {
            margin-bottom: 4px;
        }

        .footer-partner {
            padding-top: 0;

            .partners {
                .row-partners {
                    margin-left: -1px;
                    margin-right: -1px;
                    display: flex;
                    align-items: center;

                    .img {
                        padding-left: 1px;
                        padding-right: 1px;

                        img {
                            width: auto;
                            height: auto;
                            max-width: 100%;
                        }
                    }
                }
            }
        }
    }
}
ion-segment{
    padding: 3px;
    background: rgba(118,118,128,0.24);
    width: 100%;
    &[shorting]{
        ion-segment-button{
            --background-checked:var(--ion-color-danger) !important;
            --color-checked: var(--ion-color-danger-contrast) !important;
            --indicator-height:0px;
            min-height: 42px;
            border-radius: 8px;
            border: none;
            position: relative;
            max-width: unset !important;
            &+ion-segment-button{
                &:before{
                    position: absolute;
                    left: 0;
                    height: 70%;
                    top: 15%;
                    width: 1px;
                    content: "";
                    background: rgba(142,142,147,0.30);
                }
            }
        }
    }
}
.setting-modal .modal-wrapper {
    height: 35%;
    top: 65%;
    background-color: white;
    position: absolute;
    display: block;
}

.popover-content.sc-ion-popover-ios {
    border-radius: 10px;
    top: 189px;
    left: calc(50px - var(--ion-safe-area-right, 0px))!important;
    transform-origin: right top;
    width: auto;
}
Please note you don’t need to understand everything in this code. Usually i used a purchased template or ask a designer to create the Ionic design template files for me.
Now we will modify the src/pages/register-page/register-page.module.ts file to load ReactiveFormsModule library which is mandatory to use the form we defined previously:
import { NgModule } from '@angular/core';
import { CommonModule } from '@angular/common';
import { FormsModule } from '@angular/forms';
import { ReactiveFormsModule } from '@angular/forms';

import { IonicModule } from '@ionic/angular';

import { RegisterPagePageRoutingModule } from './register-page-routing.module';

import { RegisterPage } from './register-page.page';

@NgModule({
  imports: [
    CommonModule,
    FormsModule,
    ReactiveFormsModule,
    IonicModule,
    RegisterPagePageRoutingModule
  ],
  declarations: [RegisterPage]
})
export class RegisterPagePageModule {}
Last step is to edit our src/pages/register-page/register-page.page.ts file to implement the code of our RegisterPage.
If you pay attention to the HTML code that we wrote, the user can read the terms and conditions of our application. This is a mandatory step if you want your app to be validated by Apple. To do so we will use a Ionic library called IAppBrowser to open an external page in a browser pointing to an external terms & conditions page.
Let’s install this library. Open a terminal, and write:
npm install cordova-plugin-inappbrowser
npm install @ionic-native/in-app-browser
Now we can write the code of our view:
import { AfterViewInit, Component, OnInit } from '@angular/core';
import { Router } from '@angular/router';
import { LoadingController, Platform, AlertController } from '@ionic/angular';
import { InAppBrowser } from '@ionic-native/in-app-browser/ngx';
import { FormBuilder, FormGroup, Validators } from '@angular/forms';
import { ApiserviceService } from 'src/app/services/api-service.service';

@Component({
  selector: 'app-register',
  templateUrl: './register-page.page.html',
  styleUrls: ['./register-page.page.scss'],
})
export class RegisterPage implements OnInit, AfterViewInit {
  public submitAttempt: boolean = false;
  public userForm: FormGroup;

  showWrongPattern = false;
  constructor(
    public loadingController: LoadingController,
    public router: Router,
    public platform: Platform,
    public alertController: AlertController,
    public apiService: ApiserviceService,
    public formBuilder: FormBuilder,
    public inAppBrowser: InAppBrowser) {

    this.userForm = formBuilder.group({
      firstName: ['', Validators.compose([Validators.minLength(3), Validators.required])],
      lastName: ['', Validators.compose([Validators.minLength(3), Validators.required])],
      email: ['', Validators.compose([Validators.required, Validators.pattern('^[a-zA-Z0-9_.+-]+@[a-zA-Z0-9-]+.[a-zA-Z0-9-.]+$')])],
      password: ['', Validators.compose([
        Validators.minLength(8),
        Validators.required,
        Validators.pattern('(?=.*[a-z])(?=.*[A-Z])(?=.*[0-9])(?=.*[€$@$!%*?&])[A-Za-z\d$@€$!%*?&].{8,}')
      ])],
      confirmpassword: ['', Validators.compose([
        Validators.minLength(8),
        Validators.required,
        Validators.pattern('(?=.*[a-z])(?=.*[A-Z])(?=.*[0-9])(?=.*[€$@$!%*?&])[A-Za-z\d$@€$!%*?&].{8,}')
      ])],
    });

  }

  ngOnInit() {
  }

  ngAfterViewInit() {
  }

  cgu() {
    // Your CGU url
    let url = "https://policies.google.com/terms"
    let target = "_blank"
    this.inAppBrowser.create(url, target, "location=no,zoom=no")
  }
}
The most important part in this code is the:
this.userForm = formBuilder.group({
      firstName: ['', Validators.compose([Validators.minLength(3), Validators.required])],
      lastName: ['', Validators.compose([Validators.minLength(3), Validators.required])],
      email: ['', Validators.compose([Validators.required, Validators.pattern('^[a-zA-Z0-9_.+-]+@[a-zA-Z0-9-]+.[a-zA-Z0-9-.]+$')])],
      password: ['', Validators.compose([
        Validators.minLength(8),
        Validators.required,
        Validators.pattern('(?=.*[a-z])(?=.*[A-Z])(?=.*[0-9])(?=.*[€$@$!%*?&])[A-Za-z\d$@€$!%*?&].{8,}')
      ])],
      confirmpassword: ['', Validators.compose([
        Validators.minLength(8),
        Validators.required,
        Validators.pattern('(?=.*[a-z])(?=.*[A-Z])(?=.*[0-9])(?=.*[€$@$!%*?&])[A-Za-z\d$@€$!%*?&].{8,}')
      ])],
    });
We create an Angular form group which indicates which fields are required and which are the validation rules.
It’s quite easy to read and understand the rules by reading this code.
If the form is invalid (rules are not valid), then the Create account button will be disable)
Ok let’s try to run our Ionic application to see the results in a browser:
ionic serveOnce compiled and ready, Ionic will automatically opens your browser at the following url : http://localhost:8100/ which is the default one. You should see a blank page on the right side and a menu on the left side:
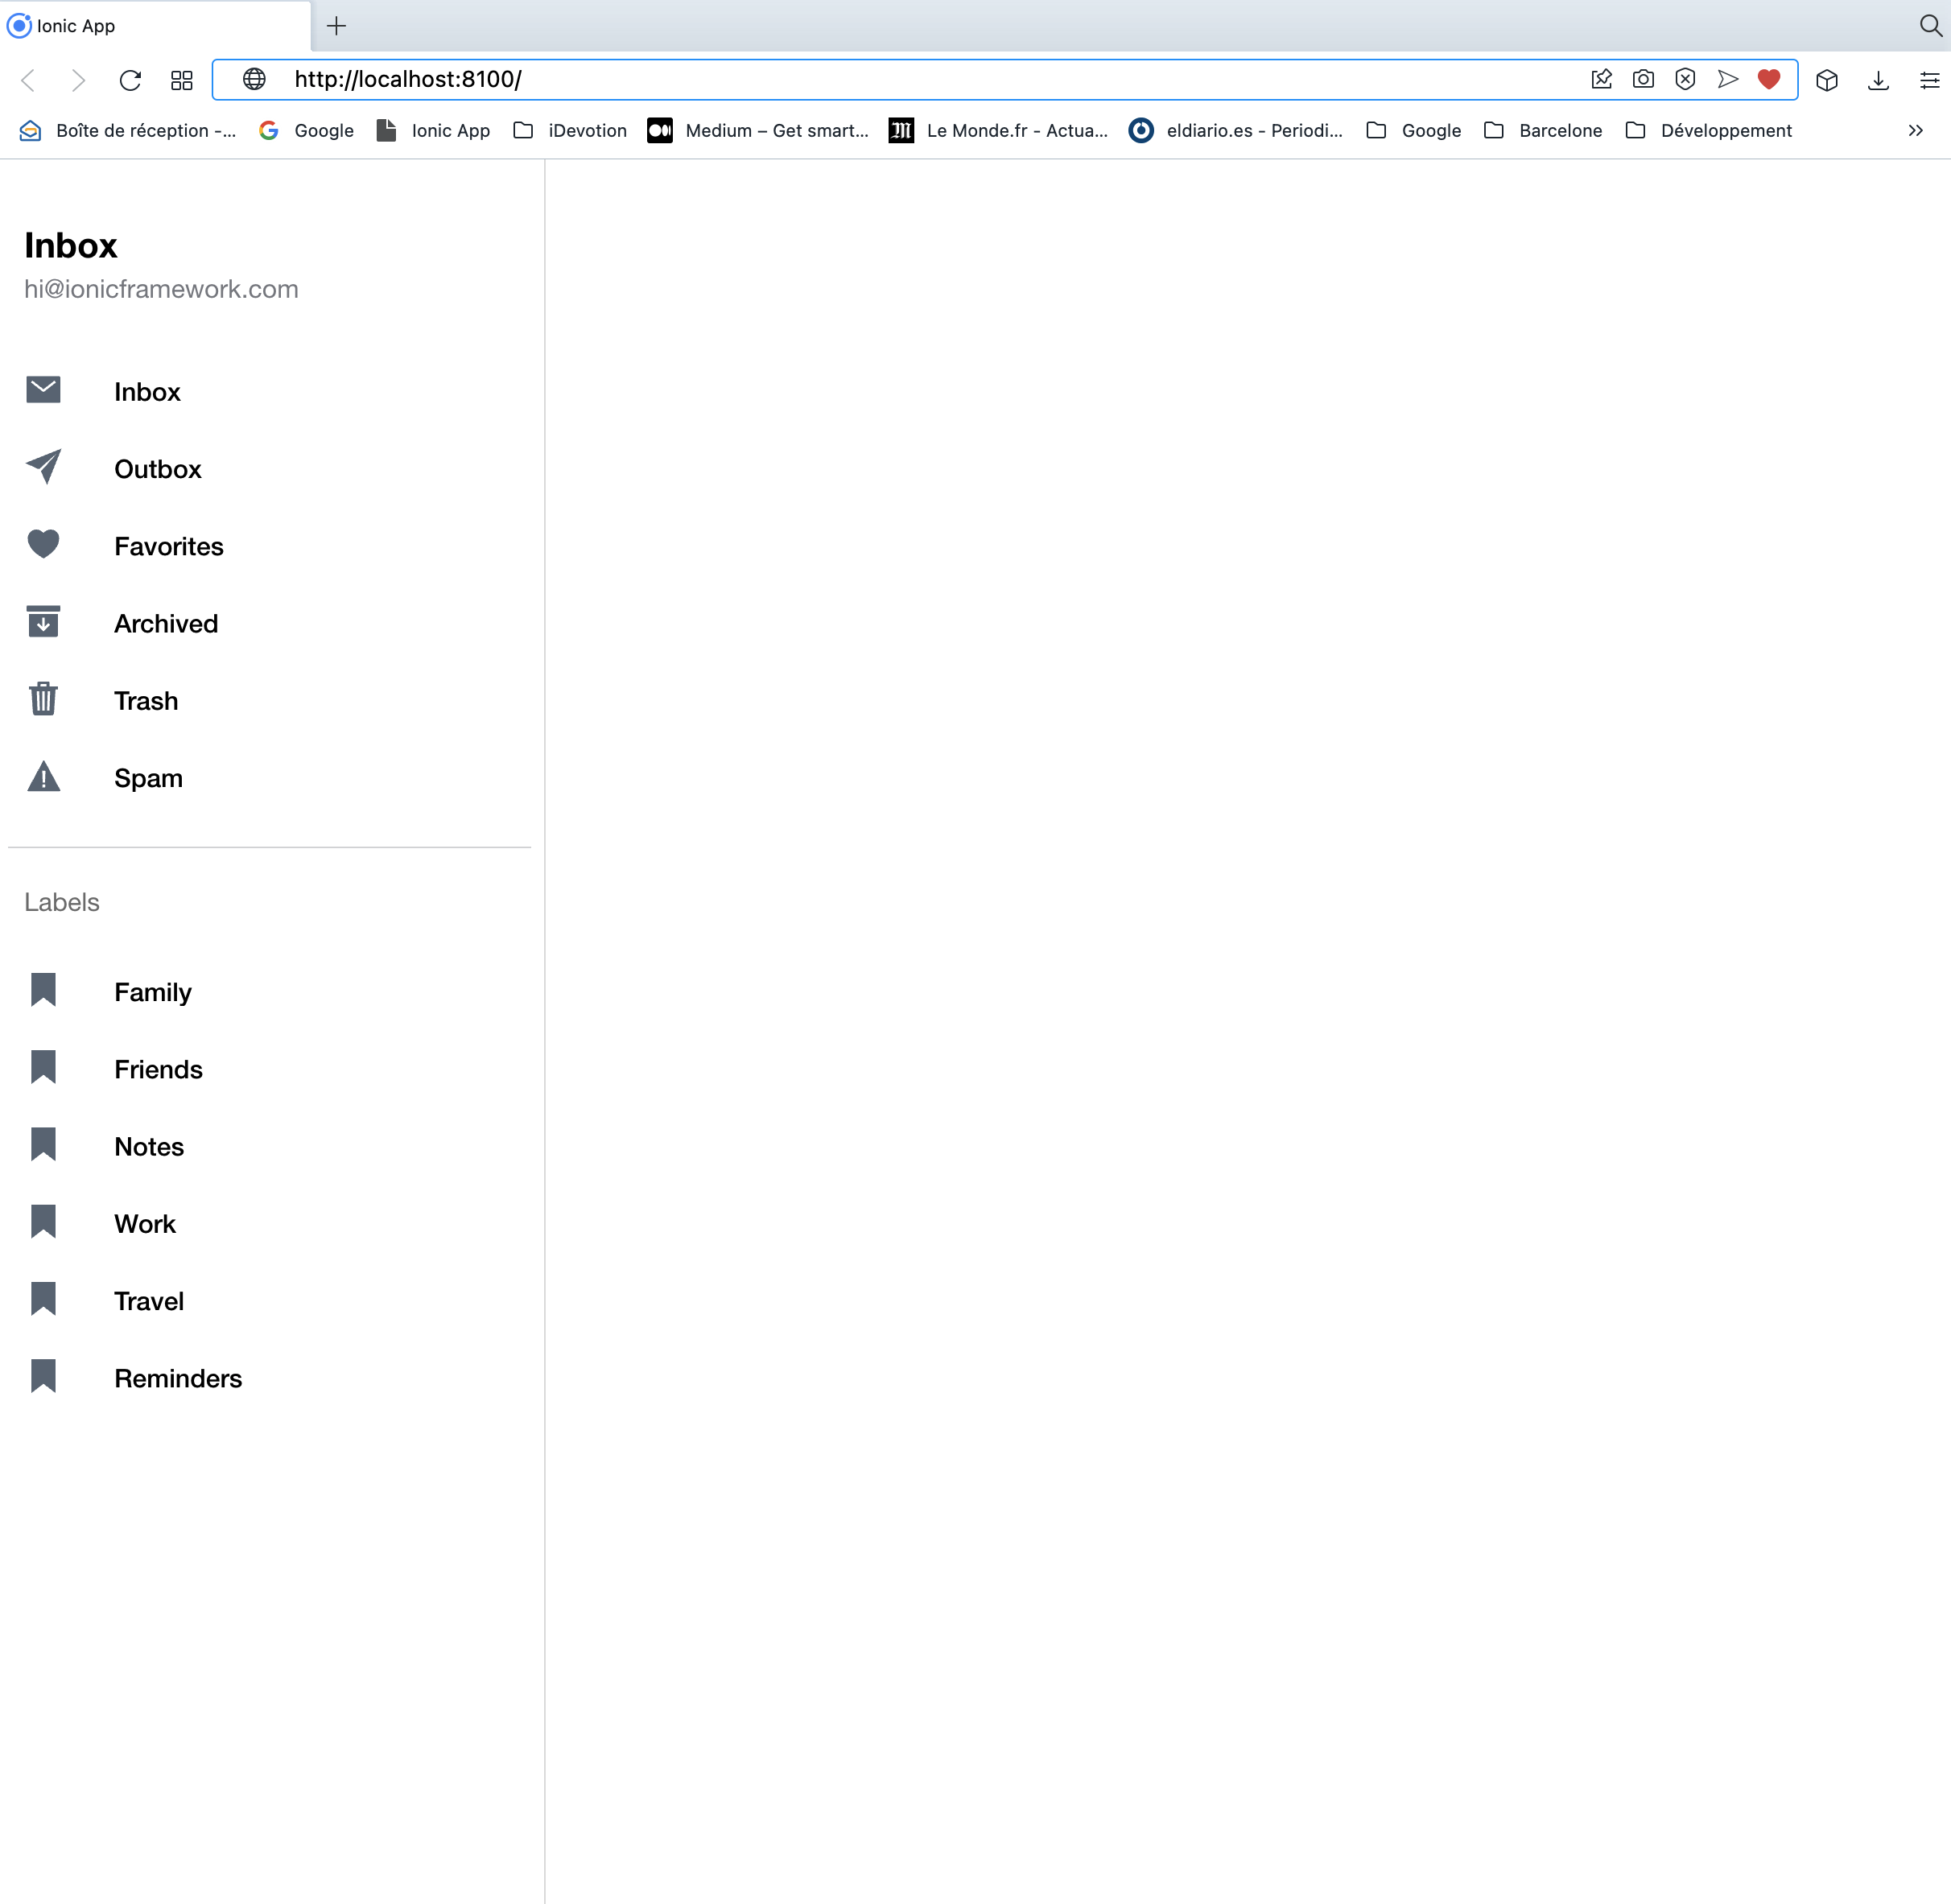
The menu is a Ionic default standard one and is configured in the app.component.html file. We will focus on it later.
To get our RegisterPage we need to go to the specific url we define in our app-routing.module.ts file which is : http://localhost:8100/register-page

If you want to check the result on a mobile screen, you can switch your browser to development mode and choose an iPhone to render the view:

Now if you fill the form with required information, the Create account button should activate, but with no effect since we didn’t implement the register() method.
Let’s focus on this. Edit our src/pages/register-page/register-page.page.ts file to implement the code:
register() {
    this.submitAttempt = true;
    let firstName = this.userForm.value["firstName"]
    let lastName = this.userForm.value["lastName"]
    let email = this.userForm.value["email"]
    let password = this.userForm.value["password"]
    let confirmpassword = this.userForm.value["confirmpassword"]

    if (password != confirmpassword) {
      this.apiService.showError("Passwords don't match");
    }
    else if (password.length<6){

    }
    else {
      //chek si le pseudo est disponible

      if (this.apiService.networkConnected) {
        this.apiService.showLoading().then(() => {
          this.showWrongPattern=false;
           let params = {
                  "email": email,
                  "password": password,
                  "firstName":firstName,
                  "lastName":lastName
          }
          this.createAccount(params)
        })
      }
      else {
        this.apiService.showNoNetwork();
      }
    }
  }
This method will get the values submitted with the form, then check if passwords are matching, then checks if network is connected (we will use our standard methods defined earlier to do this) or display a no network message, and if everything is ok will call a createAccount method that we will implement now:
 createAccount(params) {
    if (this.apiService.networkConnected) {
      this.apiService.registerUser(params).subscribe((resultat) => {
        let status = resultat["status"];
        console.log(status)
        if (status == "OK") {
          //User created
          this.apiService.stopLoading();
          let data = resultat["data"]
          console.log(data)
        }
        else {
          this.apiService.stopLoading();
          let error = resultat["error"]
          console.log(error)
          if (error.status == 400) {
            this.apiService.showError('An account already exists for this email. Please login');
          }
          else {
            this.apiService.showError("An error occured")
          }
      }
      })
    }
    else {
      this.apiService.stopLoading();
      this.apiService.showNoNetwork()
    }
  }
This method is quite simple too. It checks if network is still connected (or display an error message), then call a method registerUser of our apiService file and check the result status of this call. If the status is OK the account has been created otherwise an error message is showned.
Adding a registerUser method in our ApiService file
The registerUser method will call our backend to create a user as we have seen earlier on previous tutorial.
If we refer to the documentation of our JWT API, we can create a user with an HTTP post call and passing paramaters email,password:
curl -X POST \
  http://127.0.0.1:8000/auth/users/ \
  -H 'Content-Type: application/json' \
  -d '{"email": "csurbier@idevotion.fr", "password": "YOURPASSWORD_75$"}'
So let’s implement this method in our api-service.service.ts file by adding the following code:
registerUser(params) {
    const options = {
      headers: new HttpHeaders({
        'Content-Type': 'application/json'
      })
    };
    return new Observable(observer => {
      this.http.post(this.getCreateUserUrl, params, options).subscribe(
        (val) => {
          observer.next({ "status": "OK", "data": val })
          observer.complete()
        },
        response => {
          console.log("POST call in error", response);
          observer.next({ "status": "KO", "error": response })
          observer.complete()
        },

        () => {

        });
    })
  }
the getCreateUserUrl has already been defined in our api-service.service.ts file and it’s value is
this.getCreateUserUrl = this.virtualHostName + "auth/users/"
The virtualHostName comes from the definition:
export const domainConfig = {
  client: 'chattuto',
  virtual_host: 'http://127.0.0.1:8000/',
  domainApp: 'http://127.0.0.1:8000/',
  staticStorage: "static/storage/"
}
We will see later how to deploy our backend code on a real server but for now we run it on our local machine.
With that in place, we can test our Create account button, but of course we need to have our backend running by launching the command:
python manage.py runserverNow if you fill the form and click the Create account button, you should see in your javascript console log, the following values:
OK
register-page.page.ts:88 {email: "testcsurbier@idevotion.fr", id: "42266767-119e-486f-890d-db67c85cf5ec"}
Our backend processes the request correctly and send us back the identifier (id parameter in the json) of our user.
We can also use the Django admin to check that the user has been created.
If we check the user values with the Django admin we can see that first_name and last_name values are empty. It’s because the JWT API only takes an email and a password as arguments.
You can find code of this tutorial as usual on my Github
In next tutorial, we will see how to complete the User fields and how to get the JWT access token to automatically authenticate the user when doing API calls.
Questions/Answers
- Modify this code snippet to have first name and last name not mandatory
this.userForm = formBuilder.group({
      firstName: ['', Validators.compose([Validators.minLength(3), Validators.required])],
      lastName: ['', Validators.compose([Validators.minLength(3), Validators.required])],
      email: ['', Validators.compose([Validators.required, Validators.pattern('^[a-zA-Z0-9_.+-]+@[a-zA-Z0-9-]+.[a-zA-Z0-9-.]+$')])],
      password: ['', Validators.compose([
        Validators.minLength(8),
        Validators.required,
        Validators.pattern('(?=.*[a-z])(?=.*[A-Z])(?=.*[0-9])(?=.*[€$@$!%*?&])[A-Za-z\d$@€$!%*?&].{8,}')
      ])],
      confirmpassword: ['', Validators.compose([
        Validators.minLength(8),
        Validators.required,
        Validators.pattern('(?=.*[a-z])(?=.*[A-Z])(?=.*[0-9])(?=.*[€$@$!%*?&])[A-Za-z\d$@€$!%*?&].{8,}')
      ])],
    });

  }
Answer
this.userForm = formBuilder.group({
      firstName: [''],
      lastName: [''],
      email: ['', Validators.compose([Validators.required, Validators.pattern('^[a-zA-Z0-9_.+-]+@[a-zA-Z0-9-]+.[a-zA-Z0-9-.]+$')])],
      password: ['', Validators.compose([
        Validators.minLength(8),
        Validators.required,
        Validators.pattern('(?=.*[a-z])(?=.*[A-Z])(?=.*[0-9])(?=.*[€$@$!%*?&])[A-Za-z\d$@€$!%*?&].{8,}')
      ])],
      confirmpassword: ['', Validators.compose([
        Validators.minLength(8),
        Validators.required,
        Validators.pattern('(?=.*[a-z])(?=.*[A-Z])(?=.*[0-9])(?=.*[€$@$!%*?&])[A-Za-z\d$@€$!%*?&].{8,}')
      ])],
    });

}- How to run a ionic project and see results into a browser ?
Answer
ionic serve
- If we want to add a method to dialog with our backend API (such a login for instance), in which file should we do this ?
Answer
api-service.service.ts file
- In next tutorial, we will add code to update a User and set it’s first name and last name values. Refering to our previous tutorial and the API documentation (http://127.0.0.1:8000/documentation/) which endpoint should we use ?
Answer
The /api/user/{id}/ endpoint with a Patch Http request