
Problem to solve to use Stripe checkout within Ionic application.
Stripe Checkout is a prebuilt, hosted payment page that lets you collect payments quickly. There are a lot of advantages to use Stripe checkout such as: real time credit card validation, easily customisable, quick implementation, mobile ready with Apple pay and Google pay…
To implement Stripe checkout it is really easy, you just need to display a payment button on your page which on click will call an API on your server to create a checkout session and then on API response, redirect to Stripe checkout url to display the payment form. Once the payment is done successfully or not, Stripe will notify you using a success redirect url or a cancel url.
These success url or cancel url requirements are a big problem for a Ionic mobile application, since it is not possible to implement them. We could think to use a specific deeplink, but Stripe checkout requires HTTPS link so it is not an option.
In this tutorial, i will show you how to use Stripe checkout with Ionic 5 and Django and implement the Stripe checkout worklow in a Ionic 5 mobile application.
Get the source code
Proposed solution to use Stripe checkout and make payment with Ionic
Since it is not possible to redirect Stripe success or cancel urls to our ionic mobile application, we need to implement these urls on a server and we will use Django for that. Then our Django backend will need to inform the Ionic application about payment information status. To do that, we will see that there are some solutions.
Ok enough talking. Let’s dive into the code and first let’s create our Ionic 5 application with command:
ionic start stripecheckout blank --capacitor --project-id=stripecheckout --package-id=com.idevotion.stripecheckout
Then we will add Stripe javascript sdk into our generated ionic application
Add Stripe checkout to Ionic page
Let’s edit the index.html file and import Stripe javascript sdk
<head>
  <meta charset="utf-8" />
  <title>Ionic App</title>

  <base href="/" />

  <meta name="color-scheme" content="light dark" />
  <meta name="viewport" content="viewport-fit=cover, width=device-width, initial-scale=1.0, minimum-scale=1.0, maximum-scale=1.0, user-scalable=no" />
  <meta name="format-detection" content="telephone=no" />
  <meta name="msapplication-tap-highlight" content="no" />

  <link rel="icon" type="image/png" href="assets/icon/favicon.png" />

  <!-- add to homescreen for ios -->
  <meta name="apple-mobile-web-app-capable" content="yes" />
  <meta name="apple-mobile-web-app-status-bar-style" content="black" />

  <script src="https://js.stripe.com/v3/"></script>

</head>
Now let’s edit the home.page.html file to add a button which will trigger Stripe checkout on click
<ion-header [translucent]="true">
  <ion-toolbar>
    <ion-title>
      Blank
    </ion-title>
  </ion-toolbar>
</ion-header>

<ion-content [fullscreen]="true">
  <ion-header collapse="condense">
    <ion-toolbar>
      <ion-title size="large">Blank</ion-title>
    </ion-toolbar>
  </ion-header>

  <div id="container">

     <ion-button #stripeButton color="primary">Pay with Stripe</ion-button>

  </div>
</ion-content>
In the home.page.ts file we will initialise Stripe with the publishable_key that we can get from our Stripe dashboard :
import { Component, ElementRef, ViewChild } from '@angular/core';
import { LoadingController } from '@ionic/angular';
import { HttpClient, HttpHeaders } from '@angular/common/http';
import { Plugins } from '@capacitor/core';
const { Storage } = Plugins;

declare var Stripe;

@Component({
  selector: 'app-home',
  templateUrl: 'home.page.html',
  styleUrls: ['home.page.scss'],
})
export class HomePage {
  stripe = Stripe("pk_test_XwRn88Fmqzh3966EVK92hpJY00jGOfGKPt");

  @ViewChild('stripeButton',{read:ElementRef}) stripeButton : ElementRef;
   constructor(public loadingController:LoadingController,
    private http: HttpClient) {


  }
Then once the view will be initiated, we will grab a reference to our Stripe button and will listen for click event
 ngAfterViewInit(){
    const stripeButton = this.stripeButton.nativeElement;
    stripeButton.addEventListener('click', event => {
      console.log("=== CLICK BUTTON ")
   });
  }
On click we can show a loader and then call our Django API (that we will create soon) to create and obtain a stripe checkout session. Then if everything goes fine we can redirect the user to the Stripe checkout page. Here is the full method:
ngAfterViewInit(){
    const stripeButton = this.stripeButton.nativeElement;
    stripeButton.addEventListener('click', event => {
      console.log("=== ON CLIQUE LE BUTTON ")
      const options = {
        headers: new HttpHeaders({
            'content-type': 'application/json',
        })
    };

      this.showLoader()
      // call API
      let params = {
        "currency" : "eur",
        "quantity": 1,
        "price": 1000,
        "productName" : "My product"
      }
      console.log(params)
      this.http.post("https://app-e06ec9e7-b121-44fa-a383-54bbda3f9706.cleverapps.io/create-checkout-session/", params,options)
      .subscribe(async res => {
        console.log(res)


          let status = res["status"]
          if (status=="OK"){
            let sessionID = res["session"]
            // save session ID
            await Storage.set({key: "paymentSessionID", value: sessionID});

            //Redirect sur checkout
            this.stripe.redirectToCheckout({ sessionId: sessionID}).then((result) => {
              console.log(result)
            })
          }
          else{
            console.log("===ERROR")
            this.hideLoader()
          }

      }, error => {
           this.hideLoader()
          console.log(error);// Error getting the data
        });
      });
  }
For demo purpose i have hardcoded the payment information (price, quantity, product name).
If the API call is successfull (status equals OK), then we store the received session id using capacitor storage (we will discuss the reason why later) and then we redirect the user to Stripe checkout passing the session id that we get from the API
//Redirect sur checkout
            this.stripe.redirectToCheckout({ sessionId: sessionID}).then((result) => {
              console.log(result)
            })
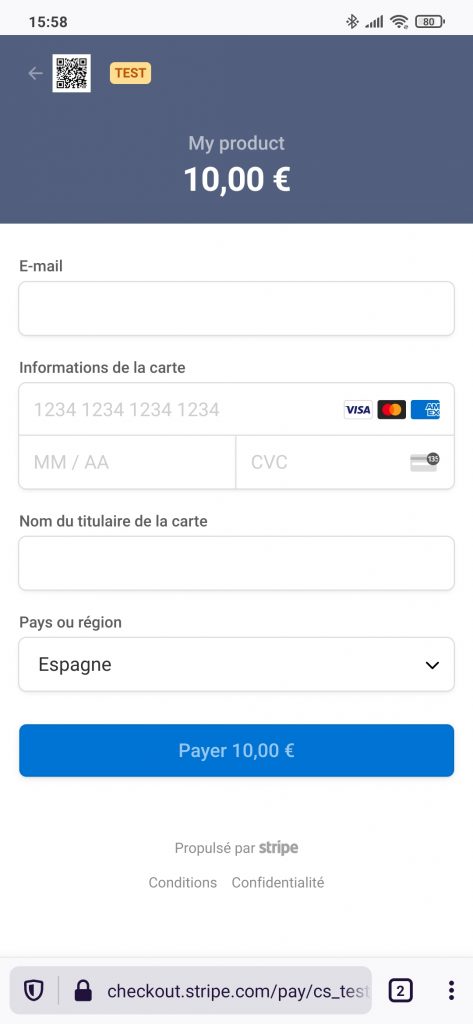
At this point, the application will go on background and the user will be redirected on his device browser, on which the stripe payment form should appeared.
Now let’s focus on the Django part
Add Stripe checkout to Django project
In our Django project, we will define 3 endpoints to manage Stripe checkout:
url(r'^create-checkout-session/', createCheckoutSession, name='create-checkout-session'),
url(r'^checkout-session-success/', checkoutSessionSuccess, name='checkout-session-success'),
url(r'^checkout-session-failure/', checkoutSessionFailure, name='checkout-session-failure'),
The method createCheckoutSession is the endpoint used previously in the ionic page, to send payment information (price, currency) and to receive the stripe checkout session id. So let’s add a view that will manage this:
@csrf_exempt
@api_view(['POST'])
def createCheckoutSession(request):
    import stripe
    stripe.api_key = settings.STRIPE_API_KEY
    if request.method == 'POST':
        currency = request.data["currency"]
        quantity = request.data["quantity"]
        price = request.data["price"]
        productName = request.data["productName"]
        session = stripe.checkout.Session.create(
            payment_method_types=['card'],
            line_items=[{
                'price_data': {
                    'currency': currency,
                    'product_data': {
                        'name': productName,
                    },
                    'unit_amount': price,
                },
                'quantity': quantity,
            }],
            mode='payment',
            success_url='https://app-e06ec9e7-b121-44fa-a383-54bbda3f9706.cleverapps.io/checkout-session-success/?session_id={CHECKOUT_SESSION_ID}',
            cancel_url='https://app-e06ec9e7-b121-44fa-a383-54bbda3f9706.cleverapps.io/checkout-session-failure/?session_id={CHECKOUT_SESSION_ID}',
        )
        newdict = {'status': 'OK', 'session': session.id}
        return JsonResponse(newdict)
    else:
        return HttpResponse(status=404)
Nothing really complicated. We use Django rest framework to define our endpoint and get the parameters. Then we create a Stripe checkout session with the parameters and our success / cancel urls (the two other endpoints that we defined). Finally if everything goes fine, we send our response with a JSON containing the status and the session identifier. For success and cancel endpoint, we need to create these methods:
def checkoutSessionSuccess(request):
    session_id = request.GET['session_id']
    stripe.api_key = settings.STRIPE_API_KEY
    if session_id:
        try:
            session = stripe.checkout.Session.retrieve(session_id)
            customer = stripe.Customer.retrieve(session.customer)
            payment = Payment()
            payment.sessionId = session.id
            payment.customerId = customer.id
            payment.success=True
            payment.save()
            return render(request,'bo/templates/bo/success.html', {})
        except Exception as e:
            logger.error(e)
            return render(request,'bo/templates/bo/error.html', {})


def checkoutSessionFailure(request):
    session_id = request.GET['session_id']
    stripe.api_key = settings.STRIPE_API_KEY
    if session_id:
        try:
            session = stripe.checkout.Session.retrieve(session_id)
            customer = stripe.Customer.retrieve(session.customer)
            payment = Payment()
            payment.sessionId = session.id
            payment.customerId = customer.id
            payment.success = False
            payment.save()
            return render(request,'bo/templates/bo/error.html', {})
        except Exception as e:
            logger.error(e)
            return render(request,'bo/templates/bo/error.html', {})
On success we can retrieve the session and the customer and save the results in our model call Payment with a success status.
On cancel, we do the same but with a payment.success to False.
On success.html page we can display a message to the user that the payment has been successfull and that he can go back to the application.
Same for error.html but with a payment error message.
How to notify Ionic application about Stripe checkout payment status ?
At this point, the user is still redirected to it’s device browser and outside our Ionic application. On the success and error pages, we display a message asking him to go back to the application. So we can expect that he will do it. If so, when application launching again (remember application was suspended in background), we can check if we have a payment in progress and check the status of this payment by asking our Django backend.
Remember the :
await Storage.set({key: "paymentSessionID", value: sessionID});
This is how we can know a payment is in progress. So when application resume, we can check the status and determine actions (go to a payment successfull page or a payment error page)
 //Subscribe on resume
    this.platform.resume.subscribe(async () => {
      let paymentInProgress = await Storage.get({key: "paymentSessionID"});
      if (paymentInProgress){
        let sessionId = paymentInProgress.value;
        // Remove key for future launch
        Storage.remove({key: "paymentSessionID"});
        console.log("========== NEED TO CHECK STATUS FOR PAYMENT")
        const options = {
          headers: new HttpHeaders({
              'content-type': 'application/json',
          })
      };
        let params = {
          "sessionId" : sessionId
        }
        console.log(params)
        this.http.post("https://app-e06ec9e7-b121-44fa-a383-54bbda3f9706.cleverapps.io/paymentCheckStatus/", params,options)
        .subscribe(async res => {
            console.log(res)
            let status = res["status"]
            if (status=="OK"){
              this.router.navigateByUrl("/payment-ok")
            }
            else{
              this.router.navigateByUrl("/payment-ko")
            }
        })
      }
    });
It’s important to remove the key paymentSessionID from our capacitor storage once read, to avoid checking at next launch.
In our Django backend, we will add this new url paymentCheckStatus
url(r"^paymentCheckStatus/",paymentCheckStatus,name="paymentCheckStatus"),
and the corresponding view:
@csrf_exempt
@api_view(['POST'])
def paymentCheckStatus(request):
    if request.method == 'POST':
        status ="KO"
        sessionId = request.data["sessionId"]
        try:
            payment = Payment.objects.get(sessionId=sessionId)
            if payment.success:
                status="OK"
            else:
                status = "KO"
        except Exception as e:
            logger.error(e)
            status = "KO"
        newdict = {'status': status}
        return JsonResponse(newdict)
    else:
        return HttpResponse(status=404)
And voila based on the status our Ionic application can go to a successful payment page or to an error page
Conclusion
We have seen in this tutorial one method to use Stripe checkout within a Ionic application. We have implemented a simple system with a little compromise. Once redirected outside our Ionic application, the user will need to go back manually to the application. If not, the Ionic application will know nothing about the payment.
Another better solution, could have been to implement deeplinks in our ionic application (one for success and one for error payments). Then in our Django views (success or cancel) we could have redirected automatically the user to our app using the deeplinks.
We could also have used push notifications to send a custom message to the application to notify about the payment status.