- Share on
Secure Ionic 4 API with oAuth2 - Part 2
DAY 4 - July 2019To get the list of our users, we will add a new method to our ApiDjangoService:
getUsers() {
    const options = {
      headers: new HttpHeaders({
        'Authorization': 'Bearer ' + this.tokenSSO,
        'Content-Type': 'application/json'
      })
    };
   let url = this.getUserUrl
    return Observable.create(observer => {
      // At this point make a request to your backend to make a real check!
      console.log("on appelle BACKEND encoded url " + url);
      this.http.get(url, options)
        .pipe(retry(1))
        .subscribe(res => {
          observer.next(res);
          observer.complete();
        }, error => {
          observer.next();
          observer.complete();
          console.log(error);// Error getting the data
        });
    });
  }
To be authenticated we need to pass the oAuth2 token in the headers of the HTTP request. That is the purpose of :
const options = {
      headers: new HttpHeaders({
        'Authorization': 'Bearer ' + this.tokenSSO,
        'Content-Type': 'application/json'
      })
    };
Then we call our users API url and return the JSON results to our observable.
 let url = this.getUserUrl
    return Observable.create(observer => {
      // At this point make a request to your backend to make a real check!
      console.log("on appelle BACKEND encoded url " + url);
      this.http.get(url, options)
        .pipe(retry(1))
        .subscribe(res => {
          observer.next(res);
          observer.complete();
        }, error => {
          observer.next();
          observer.complete();
          console.log(error);// Error getting the data
        });
    });
  }
Finally we modify our AppComponent, to call this method once we are authenticated:
accessAuthorizedWithUrl() {
    //Aks list of users
    this.apiService.getUsers().subscribe((list)=>{
      console.log(JSON.stringify(list))
    })
  }
Ok, so now you can launch ionic
ionic serve
And observe the result in the javascript console of your browser: 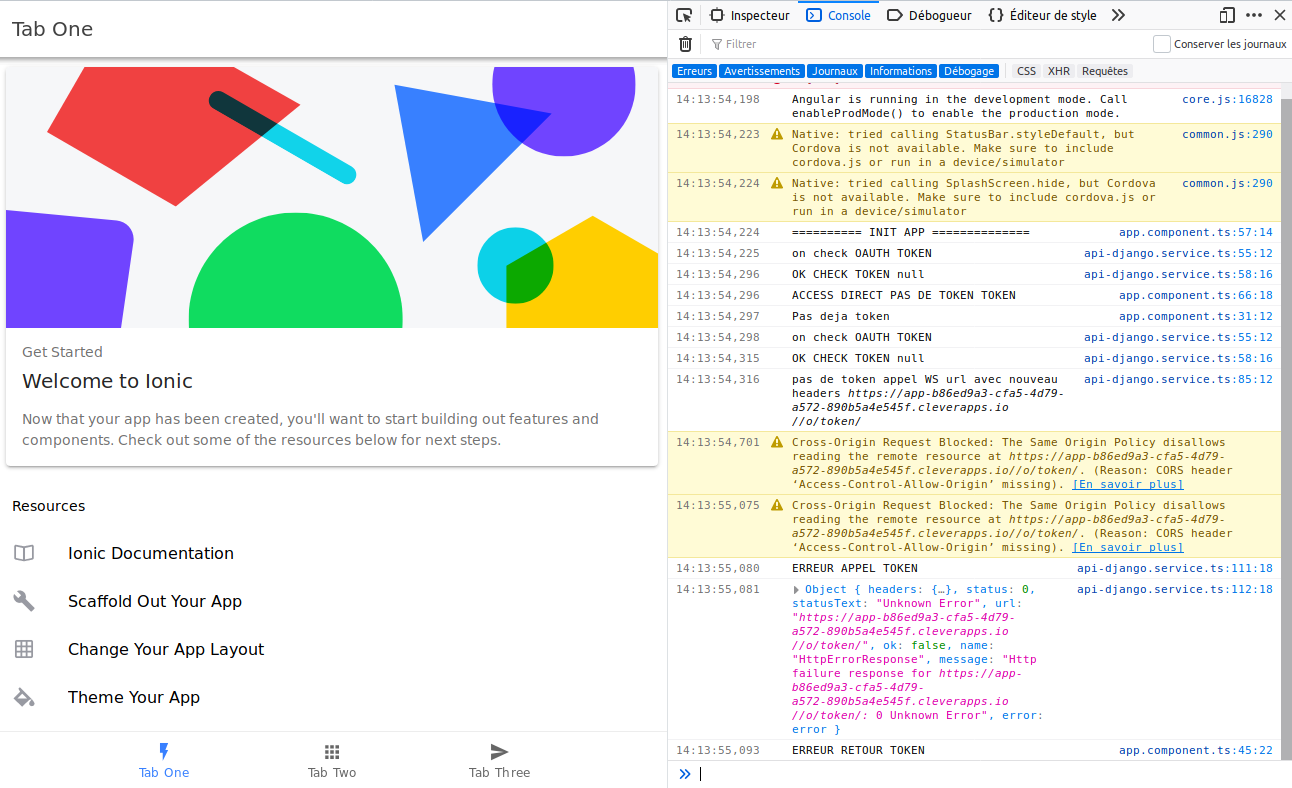
Something looks wrong and is relative to CORS issues, as we can read in the error log:
 Cross-Origin Request Blocked:
 The Same Origin Policy disallows reading the remote resource at https://app-b86ed9a3-cfa5-4d79-a572-890b5a4e545f.cleverapps.io//o/token/.
 (Reason: CORS header ‘Access-Control-Allow-Origin’ missing).
To solve the issue, we need to modify our Django backend and will use the following library : Django Cors Headers. We add it to our requirements.txt file:
django>=2.0.11
psycopg2==2.7 --no-binary psycopg2
pillow==5.1.0
django-jet
djangorestframework
django-filter
git+https://github.com/mago960806/django-rest-framework-docs.git
django-oauth-toolkit
django-cors-middleware
Then we need to modify our settings.py file and add the library in our middleware at the first position of the list:
MIDDLEWARE = [
    'corsheaders.middleware.CorsMiddleware',
    'django.middleware.security.SecurityMiddleware',
    'django.contrib.sessions.middleware.SessionMiddleware',
    'django.middleware.common.CommonMiddleware',
    'django.middleware.csrf.CsrfViewMiddleware',
    'django.contrib.auth.middleware.AuthenticationMiddleware',
    'django.contrib.messages.middleware.MessageMiddleware',
    'django.middleware.clickjacking.XFrameOptionsMiddleware',
]
And now still in our settings.py file we will allow ALL origin:
CORS_ORIGIN_ALLOW_ALL=TrueNow we can deploy again our backend on clever cloud (commit and push), and try again our Ionic application by refreshing our browser.
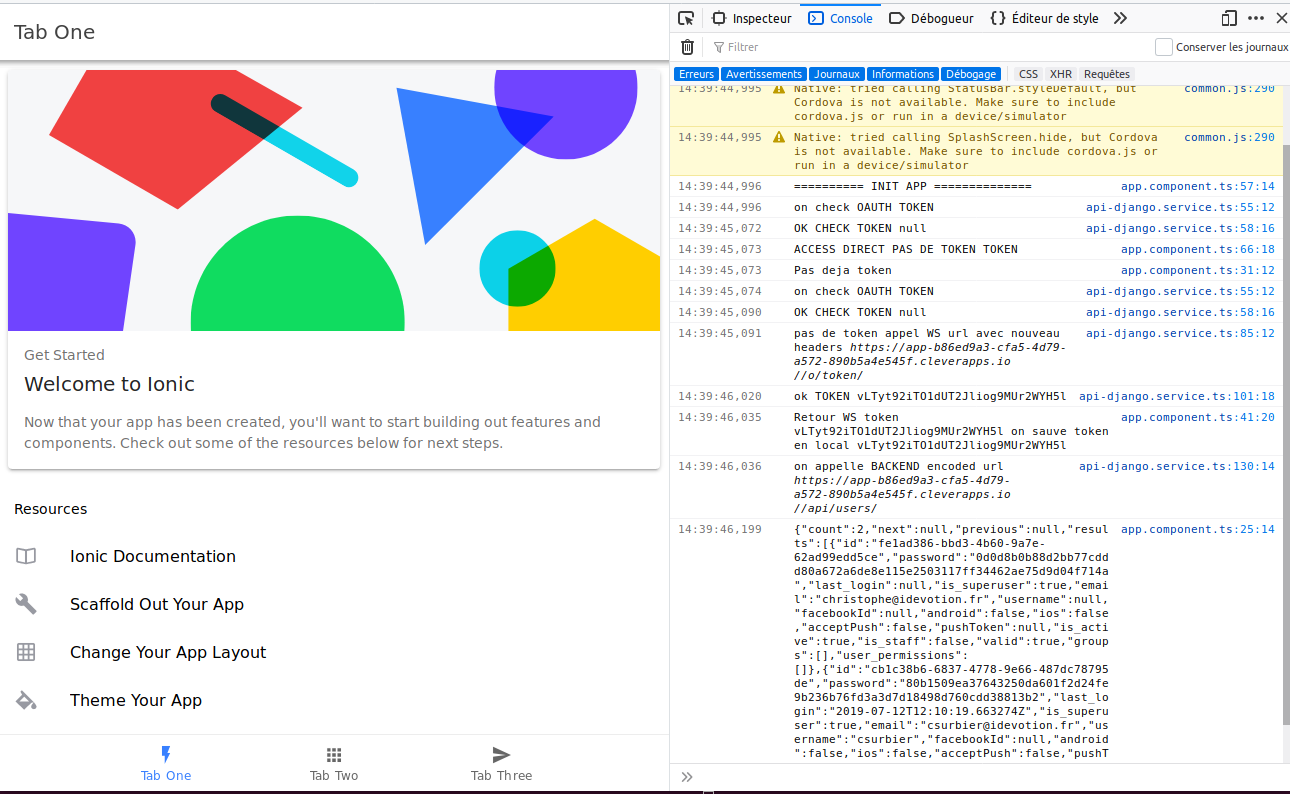
And this time, if you look in your development console logs of your browser, you should see our Application getting an oAuth2 Token, then call our users API and diplay our users lists.
The source code of our Ionic and Django backend for this Day four tutorial can be found on the following Github repository