- Share on
Display geolocated items on a google map with Ionic
November 2019
Ok to display our bikes on a google map, we need to add a new ionic page that we will call : ShowBikes
ionic g page ShowBikesand as usual, we will move the new directory created show-bikes into the pages directory, and adapt the app-routing.mobule.ts file to reflect the change
{ path: 'show-bikes', loadChildren: './pages/show-bikes/show-bikes.module#ShowBikesPageModule' }Now we want to geolocate our user to be able to call our new django api endpoint. So we need to install some new plugins and this to our ionic application
ionic cordova plugin add cordova-plugin-geolocation
npm install @ionic-native/geolocation
ionic cordova plugin add cordova-plugin-request-location-accuracy
npm install @ionic-native/location-accuracy
next modify our app.module.ts to import and initialize this library
import { Geolocation } from '@ionic-native/geolocation/ngx';
import { LocationAccuracy } from '@ionic-native/location-accuracy/ngx';
@NgModule({
  declarations: [AppComponent],
  entryComponents: [],
  imports: [BrowserModule,
     IonicModule.forRoot(),
     IonicStorageModule.forRoot(),
     HttpClientModule,
     AppRoutingModule],
  providers: [
    StatusBar,
    SplashScreen,
    Network,
    { provide: RouteReuseStrategy, useClass: IonicRouteStrategy },
    ApiDjangoService,
    Geolocation,
    LocationAccuracy
  ],
  bootstrap: [AppComponent]
})
export class AppModule {}
We added the Geolocation module into the providers list.
Now we can edit our show-bikes.pages.ts to import some of the libraries that we will need
import { Component, OnInit } from '@angular/core';
import { Geolocation,Geoposition } from '@ionic-native/geolocation/ngx';
import { Platform } from '@ionic/angular';
import { ApiDjangoService } from '../../services/api-django.service';
import { Router } from '@angular/router';
import { LocationAccuracy } from '@ionic-native/location-accuracy/ngx';
@Component({
  selector: 'app-show-bikes',
  templateUrl: './show-bikes.page.html',
  styleUrls: ['./show-bikes.page.scss'],
})
export class ShowBikesPage implements OnInit {
  constructor(public geolocation: Geolocation,
    public apiService: ApiDjangoService,
    public platform : Platform,
    public locac : LocationAccuracy,
    public router: Router) {
    }
  ngOnInit() {
  }
}
If you remember the tutorial for login and registering users, we do nothing after logged in or registered successfully. It is time to redirect the end user to this new page show-bikes
this.router.navigateByUrl("/show-bikes")Ok now we need to write the method geoloc which will geolocate the user
geoloc() {
    return new Promise(resolve => {
      if (this.platform.is('cordova')) {
        let options = {
          enableHighAccuracy: true,
          maximumAge:0,
          timeout:10000
        };
        console.log("------  PLATFORM CORDOVA");
        this.locac.request(this.locac.REQUEST_PRIORITY_HIGH_ACCURACY).then(() => {
          this.geolocation.getCurrentPosition(options).then((position: Geoposition) => {
            console.log("============= POSITION  ================");
            console.log(position)
            resolve(position);
          }).catch((err) => {
            console.log("Error GEOLOC " + JSON.stringify(err))
            resolve(false)
          })
        });
      }
      else{
        if (navigator.geolocation) {
          navigator.geolocation.getCurrentPosition(
            position => {
              console.log("============= POSITION  ================");
              console.log(position)
              //Hardcoded
              resolve(position);
            },
            error => {
              resolve(false);
            }
          );
        }
      }
    })
  }
First, we check if user is on a mobile or using a browser.
On mobile, we can use the LocationAccuracy to get from the device the best accuracy possible, and then we ask the device to get it's current position.
Otherwise we use the navigator.geolocation method to get the position
We can now call this method on our constructor
constructor(public geolocation: Geolocation,
    public apiService: ApiDjangoService,
    public platform : Platform,
    public locac : LocationAccuracy,
    public router: Router) {
      this.apiService.showLoading()
      this.geoloc().then((position)=>{
      	  this.apiService.stopLoading()
          this.positionUser = position
           if (position){
            this.displayData()
          }
          else{
            this.apiService.showError("Sorry unable to geolocate")
          }
      })
    }
If we have a position we call our django backend api to get bikes around otherwise we display a message to the user that is position has not been retrieved.
Let's write our api method to retrieve bikes from backend
getBikesAround(latitude,longitude){
  const options = {
    headers: new HttpHeaders({
      'Authorization': 'Bearer ' + this.tokenSSO,
      'Content-Type': 'application/json'
    })
  };
  // distance is 1000 Km for example, please modify to your requirements
  let url = this.getBikesAroundUrl+"?latitude="+latitude+"&longitude="+longitude+"&max_distance=1000"
  return Observable.create(observer => {
    // At this point make a request to your backend
    this.http.get(url, options)
      .pipe(retry(1))
      .subscribe(res => {
        observer.next(res);
        observer.complete();
      }, error => {
        observer.next();
        observer.complete();
        console.log(error);// Error getting the data
      });
  });
}
Ok now before writing our displayData() method, we will configure our Ionic project to be able to use Google maps.
You need to have a valid Google Map Api Key, have activated the maps library in your console, then you need to add this API KEY in your index.html file
<script src="https://maps.googleapis.com/maps/api/js?v=3&key=YOURAPIKEY;libraries=maps"></script>
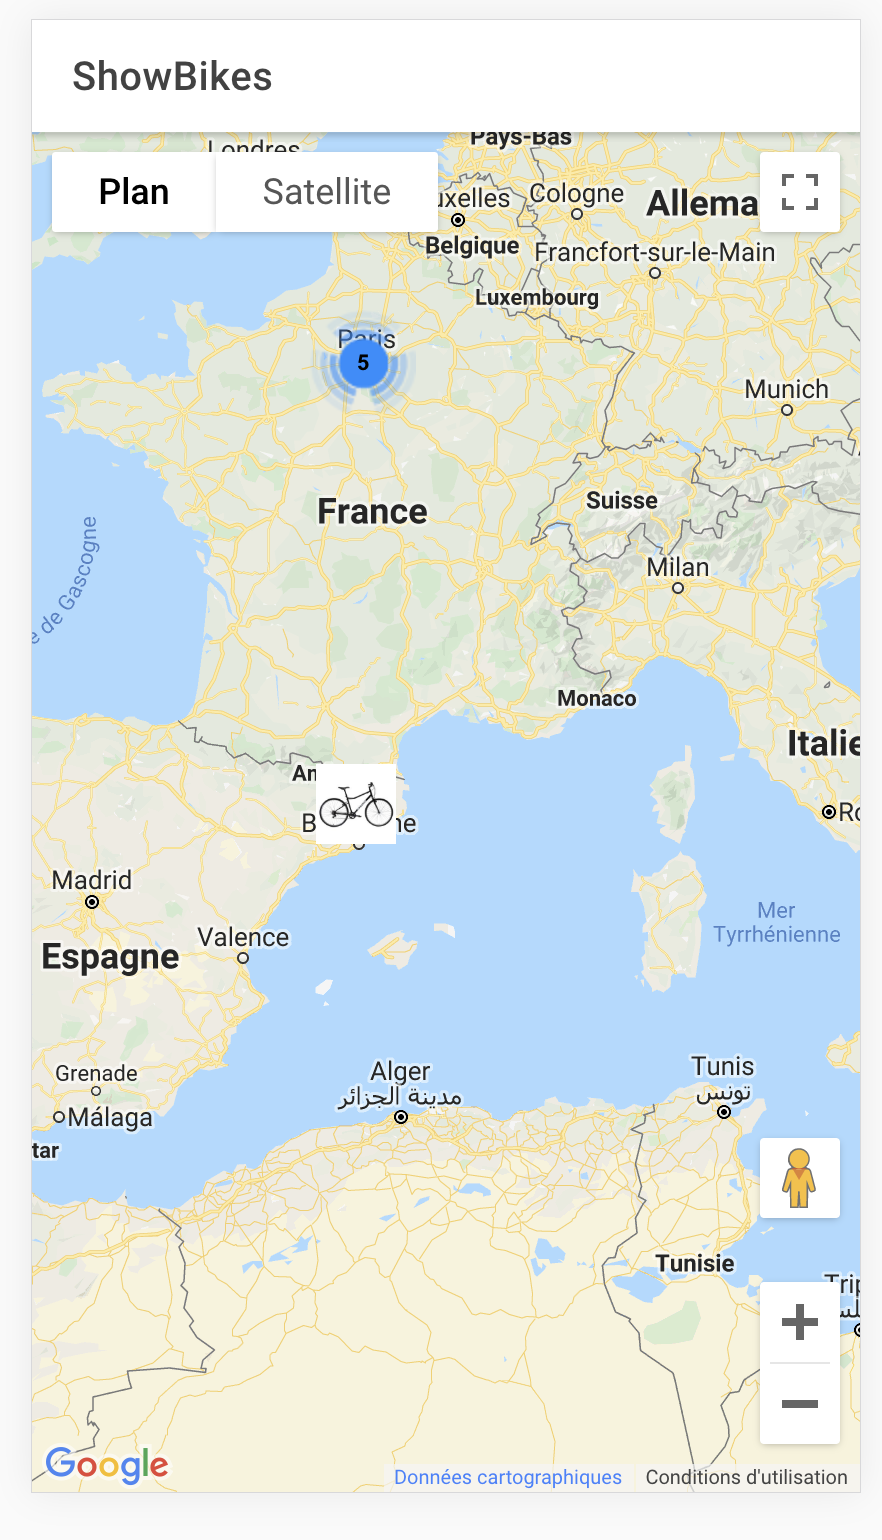
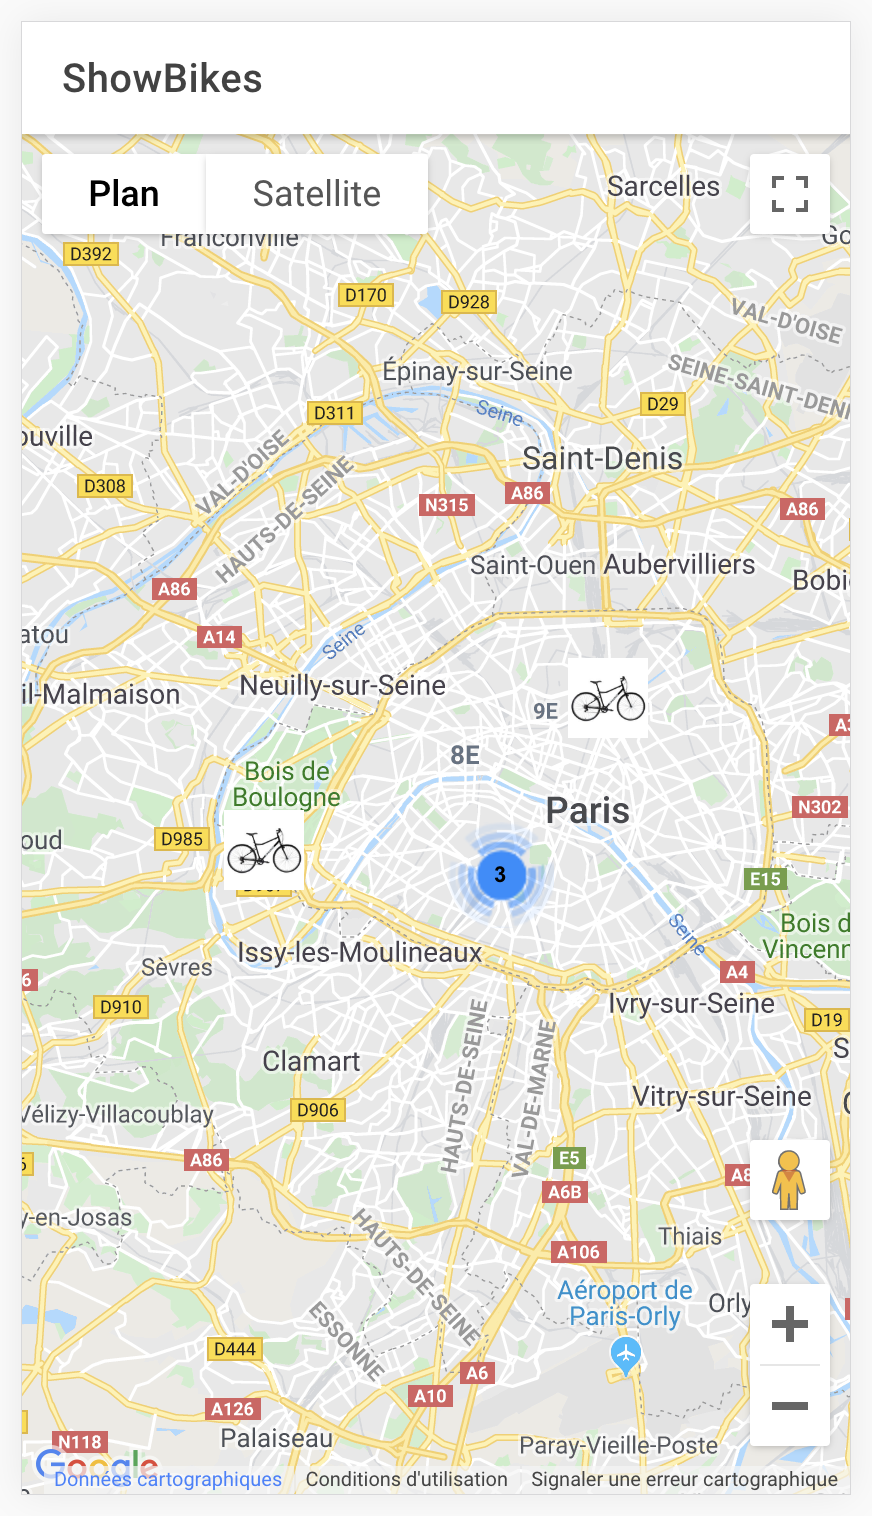
<script src="https://developers.google.com/maps/documentation/javascript/examples/markerclusterer/markerclusterer.js"></script>I have also included the markercluster javascript library because we will group our bikes using cluster. The idea is to avoid displaying a lot of bikes on the map, and to group them. Please consult the MarkerCluster api documentation, to better understand the concept.
Now we will add the import and new variables needed in our ionic code.
import { Component, OnInit,ViewChild } from '@angular/core';
import { ElementRef } from '@angular/core';
...
export class ShowBikesPage implements OnInit {
  positionUser : any;
  bikesList : any;
  markersBike : any;
  markerCluster : any;
  @ViewChild('map') mapElement: ElementRef;
  map: any;
We will write our html
<ion-header>
  <ion-toolbar>
    <ion-title>ShowBikes</ion-title>
  </ion-toolbar>
</ion-header>
<ion-content>
  <div #map id="map" class="map"></div>
</ion-content>
and our scss Don't forget the scss otherwise the google map will not be displayed.
.map {
  height: 100%;
}
Ok we have setup everything and can write the displayData() method
 displayData(){
     let latitude = this.positionUser.coords.latitude
     let longitude = this.positionUser.coords.longitude
     this.apiService.showLoading()
     this.apiService.getBikesAround(latitude,longitude).subscribe((data)=>{
       console.log(data)
       this.apiService.stopLoading()
       if (data){
         let nb = data["count"]
         if (nb>0){
          this.markersBike = []
          let latLng = new google.maps.LatLng(this.positionUser.coords.latitude, this.positionUser.coords.longitude);
          let mapOptions = {
            center: latLng,
            zoom: 13,
            mapTypeId: google.maps.MapTypeId.ROADMAP
          }
          this.map = new google.maps.Map(this.mapElement.nativeElement, mapOptions);
            for (let bike of data["results"]){
              console.log(JSON.stringify(bike))
              let location = bike.location;
              let coordinates = location.coordinates
              let currentLatitude = coordinates[1];
              let currentLongitude = coordinates[0];
              let urlPicture: string;
              urlPicture = 'assets/imgs/bike.jpg'
              var image = {
                url: urlPicture,
                size: new google.maps.Size(40, 40),
                scaledSize: new google.maps.Size(40, 40)
              };
              let latLng = new google.maps.LatLng(currentLatitude, currentLongitude);
              let marker = new google.maps.Marker({
                map: this.map,
                icon: image,
                animation: google.maps.Animation.DROP,
                position: latLng
              });
              this.markersBike.push(marker)
            }
            let styles_marker = [{
              url: 'assets/imgs/pictogroupegardemanger.png',
              height: 40,
              width: 40,
              anchor: [0, -1],
              textColor: '#010A72',
              textSize: 11
            }];
            this.markerCluster = new MarkerClusterer(this.map, this.markersBike,
               { imagePath: 'https://developers.google.com/maps/documentation/javascript/examples/markerclusterer/m' });
         }
         else{
           this.apiService.showMessage("Sorry","No bikes around you")
         }
       }
     })
  }
By default the map will center on our user position.
|
|