
Create a chat application with Ionic 5/ Angular 12/ Capacitor 3 and Django 3 – Series – Part Nine
We learned how to search users, create chat and display existing chats. Now it’s time to deals with the Chat screen.
Day 9 : Chatting with a user
Developping chatting with a user screen will not be an easy part, so we will go slowly.
Navigate to the Chat screen
First and easy task, we will create our new ChatPage:
ionic g page ChatPage
mv src/app/chat-page src/app/pages/
Then update the app-routing.module.ts file:
   {
    path: 'chat-page',
    canLoad:[AutoGuard],
    loadChildren: () => import('./pages/chat-page/chat-page.module').then( m => m.ChatPagePageModule)
  },
And modify our createChat method in HomePage to redirect to this new screen, with the **chat*** just created:
createChat(userToChat) {
    if (this.apiService.networkConnected) {
      this.apiService.showLoading().then(() => {
        this.apiService.createChat(this.userManager.currentUser.id, userToChat.id).subscribe((response) => {
          this.apiService.stopLoading()
          console.log(response)
          if (response){
            const navigationExtras: NavigationExtras = {
              state : {
                chat : new Chat().initWithJSON(response)
              }
            };
            this.router.navigate(['chat-page'], navigationExtras);
          }
        })
      })
    }
    else {
      this.apiService.showNoNetwork()
    }
  }
If we have a response from our API then we can navigate to our new ChatPage screen, and pass the chat created and received from the API:
 if (response){
    const navigationExtras: NavigationExtras = {
      state : {
        chat : new Chat().initWithJSON(response)
      }
    };
    this.router.navigate(['chat-page'], navigationExtras);
  }
We will also modif our HomePage html to be able to click on a user in our chat list, and then go to the ChatScreen. In our ion-list of existing chat:
 <ion-list mode="ios" no-lines message-list>
    <ion-item  *ngFor="let chat of chatList" (click)="goToChat(chat)">
We add a click event on each item of the list, and we can create the goToChat method:
goToChat(chat){
    const navigationExtras: NavigationExtras = {
      state : {
        chat : chat
      }
    };
    this.router.navigate(['chat-page'], navigationExtras);
  }
And to avoid code duplication, we can even modify our createChat method to use this goToChat method:
 createChat(userToChat) {
    if (this.apiService.networkConnected) {
      this.apiService.showLoading().then(() => {
        this.apiService.createChat(this.userManager.currentUser.id, userToChat.id).subscribe((response) => {
          this.apiService.stopLoading()
          console.log(response)

          if (response){
            let chat = new Chat().initWithJSON(response)
            this.goToChat(chat)
          }
        })
      })
    }
    else {
      this.apiService.showNoNetwork()
    }
  }
Let’s edit the chat-page.page.html :
<ion-header no-border mode="ios">
  <ion-toolbar color="light" mode="ios">
    <ion-buttons slot="start">
      <ion-button mode="ios" color="dark" routerDirection="back" routerLink="/home">
        <ion-icon name="arrow-back-outline"></ion-icon>Back
      </ion-button>
    </ion-buttons>
   <ion-title color="primary">{{username}}</ion-title>
  </ion-toolbar>
</ion-header>

<ion-content>

</ion-content>
and in the chat-page.page.ts file, we will get the chat passed as argument, determine which user is our user (remember we have a fromUser and toUser in the chat object) and then setup the username to display :
import { Component, OnInit } from '@angular/core';
import { ActivatedRoute, Router } from '@angular/router';
import { Chat } from 'src/app/models/chat';
import { User } from 'src/app/models/user';
import { ApiserviceService } from 'src/app/services/api-service.service';
import { UserManagerServiceService } from 'src/app/services/user-manager-service.service';

@Component({
  selector: 'app-chat-page',
  templateUrl: './chat-page.page.html',
  styleUrls: ['./chat-page.page.scss'],
})
export class ChatPagePage implements OnInit {

  chat : Chat;
  username : string =''
  myUser : User
  otherUser : User
  constructor(public apiService:ApiserviceService,
    public userManager:UserManagerServiceService,
    public router: Router,
    public route:ActivatedRoute) {

    this.route.queryParams.subscribe(params => {
      if (this.router.getCurrentNavigation().extras.state) {
        this.chat = this.router.getCurrentNavigation().extras.state.chat;
        console.log(this.chat)
        if (this.chat.fromUser.id==this.userManager.currentUser.id){
          this.myUser = this.chat.fromUser
          this.otherUser = this.chat.toUser
        }
        else{
          this.myUser = this.chat.toUser
          this.otherUser = this.chat.fromUser
        }
        this.username = this.otherUser.first_name+" "+this.otherUser.last_name
      }
      else{
        //Return home
        this.router.navigateByUrl("/home")
      }
    });
  }

  ngOnInit() {
  }

}
We can try our new code (run ionic serve if not already running) and navigate from choosing a user in our existing chat list OR from creating a new chat using the searchbar.
Now we have one issue to fix. When searching and creating a new chat, we should close the searchBar and refresh our existing chat list. If not, when doing a **back* action from the chat screen, the searchBar** will still have focus and the list has not beed updated.
We can fix this by adding to our createChat method:
this.isSearching = false
this.searchbarElement.value=""
this.listOfUser = []
this.loadExistingChat()
Final code:
createChat(userToChat) {
    if (this.apiService.networkConnected) {
      this.apiService.showLoading().then(() => {
        this.apiService.createChat(this.userManager.currentUser.id, userToChat.id).subscribe((response) => {
          this.apiService.stopLoading()

          this.isSearching = false
          this.searchbarElement.value=""
          this.listOfUser = []
          this.loadExistingChat()

          if (response){
            let chat = new Chat().initWithJSON(response)
            this.goToChat(chat)
          }

        })
      })
    }
    else {
      this.apiService.showNoNetwork()
    }
  }
Creating chat screen design
Now we will focus on chat screen design and will hardcoding things to facilitate our task. Our chat screen will look like this:

Let’s start with our messages. We should have a messages list of items to display. A message will be composed of the author of the message (yourself or the other user), a text, a created date and the information if the message has been read or not.
Let’s edit our typescript to hardcode this list of messages:
import { Component, OnInit } from '@angular/core';
import { ActivatedRoute, Router } from '@angular/router';
import { Chat } from 'src/app/models/chat';
import { User } from 'src/app/models/user';
import { ApiserviceService } from 'src/app/services/api-service.service';
import { UserManagerServiceService } from 'src/app/services/user-manager-service.service';

@Component({
  selector: 'app-chat-page',
  templateUrl: './chat-page.page.html',
  styleUrls: ['./chat-page.page.scss'],
})
export class ChatPagePage implements OnInit {

  chat : Chat;
  username : string =''
  myUser : User
  otherUser : User
  messages = [
    {
      "author":{
        "id":"3cde3f7e-261e-4ebb-8437-fa4c27d35bf0"
      },
      "text":"This is a message",
      "createdAt":"2021-08-11T14:03:05.381477Z",
      "isRead":true
    },
    {
      "author":{
        "id":"fb261053-d336-4a9b-9bcc-d206ac4b7753"
      },
      "text":"This is a response",
      "createdAt":"2021-08-11T14:05:05.381477Z"
    },
  ]
  messageToSend = ""
  constructor(public apiService:ApiserviceService,
    public userManager:UserManagerServiceService,
    public router: Router,
    public route:ActivatedRoute) {

    this.route.queryParams.subscribe(params => {
      if (this.router.getCurrentNavigation().extras.state) {
        this.chat = this.router.getCurrentNavigation().extras.state.chat;
        console.log(this.chat)
        if (this.chat.fromUser.id==this.userManager.currentUser.id){
          this.myUser = this.chat.fromUser
          this.otherUser = this.chat.toUser
        }
        else{
          this.myUser = this.chat.toUser
          this.otherUser = this.chat.fromUser
        }
        this.username = this.otherUser.first_name+" "+this.otherUser.last_name
      }
      else{
        //Return home
        this.router.navigateByUrl("/home")
      }
    });
  }

  ngOnInit() {
  }

  checkScrolling(){

  }

}
And now we can write the html code:
    <ion-list>
    <div *ngFor="let message of messages">
        <div class="chat">
      <div [class]="message.author.id === myUser.id ? 'messageFromMe' : 'messageFromOther'">
        <span>
          {{message.text}}
        </span>
        <span class="timestamp">
          {{ message.createdAt | date:'HH:mm' }}
          <ion-icon name="checkmark-done-circle-outline" *ngIf="message.author.id === myUser.id && message.isRead"></ion-icon>
          <ion-icon name="ellipse-outline" *ngIf="message.author.id === myUser.id && !message.isRead"></ion-icon>
        </span>
      </div>
        </div>
    </div>
</ion-list>-
We create a ion-list and iterate the list of messages
- We check if the author of the message is our user and if so we check the css class to messageFromMe. Otherwise the css class will be messageFromOther. The messageFromMe will display the message at the right of the screen, with the date and an icon to display if the other user has read it or not. The messageFromOther will be displayed on the left of the screen.
We can write our chat-page.page.scss file:
.chat {
    display: flex;
    flex-direction: column;
}
.messageFromOther {
    display: flex;
    flex-direction: column;
    margin: 0.2em 0;
    padding: 0.5em;
    max-width: 70%;
    margin-left: 13px;
    align-self: flex-start;
    background-color: #F1F0F0;
    color: black;
    border-radius: 10px 10px 10px 0px;
    font-size: 16px;
    .timestamp {
        font-size: 12px;
        opacity: 0.6;
    }
}
.messageFromMe {
    display: flex;
    flex-direction: column;
    margin: 0.2em 0;
    padding: 0.5em;
    max-width: 70%;
    align-self: flex-end;
    background-color:#2636be;
    color: white;
    border-radius: 10px 10px 0px 10px;
    margin-right: 13px;
    font-size: 16px;
    .timestamp {
        display: flex;
        flex-direction: row;
        justify-content: flex-end;
        align-items: center;
        font-size: 12px;
        opacity: 0.6;
        text-align: end;

        ion-icon {
            font-size: 20px;

        }
    }
}
If you don’t know css or are not a design expert (like me), please remember you still can buy a ready to use template or hire a designer.
And finally, we need to add the typing box and sent message button:
<ion-footer>
  <ion-toolbar color="light">
   <ion-row class="ion-align-items-center">
     <ion-col size="10">
      <ion-textarea   [(ngModel)]="messageToSend" autocapitalize="sentence"
      placeholder="Type a message" spellcheck="false" color="dark" autoGrow="true"
      rows="1"></ion-textarea>
     </ion-col>
     <ion-col size="2">
      <ion-button (click)="sendMessage()" shape="round" fill="clear" [disabled]="messageToSend === ''">
        <ion-icon name="paper-plane-outline"></ion-icon>
      </ion-button>
     </ion-col>
   </ion-row>
  </ion-toolbar>
</ion-footer>
Getting messages from Django backend
Now we will replace our hardcoded message list with real messages from the backend. And because we still don’t have message, i will use the Django admin to create fake messages. You just need to take a chat between you and a user that you created previously, and filling the message information:

You will need to repeat the process multiple times to have enought data for testing purpose…
We already have a default API to get Message from the backend. We will just modify the view to be able to filter for a specific chat id:
class MessageListView(generics.ListCreateAPIView):
    permission_classes = [permissions.IsAuthenticated]
    queryset = Message.objects.all().select_related("refChat")
    serializer_class = MessageSerializer
    filterset_fields = ['id','type','isRead','refChat']
    filter_backends = [DjangoFilterBackend,filters.SearchFilter,filters.OrderingFilter]
ordering = ['-createdAt']- We added the select_related("refChat") instruction to our queryset to boost performance and use sql join instruction
- We added a refChat in the list of filterset_fields which is the fields we can use to filter.
- We are ordering the messages from the most recent to the oldest
If i try the API manually
curl --location --request GET 'http://localhost:8000/api/message/?refChat=66fdac13-79ff-4d0f-a0f2-7001708f51d5' \
--header 'Authorization: Bearer eyJ0eXAiOiJKV1QiLCJhbGciOiJIUzI1NiJ9.eyJ0b2tlbl90eXBlIjoiYWNjZXNzIiwiZXhwIjoxNjI4Njk5NzAxLCJqdGkiOiIzMDAzMzYyNDY3OWY0ZjU3YmI0YzZlNTYyN2VhYmI4NiIsInVzZXJfaWQiOiIzY2RlM2Y3ZS0yNjFlLTRlYmItODQzNy1mYTRjMjdkMzViZjAifQ.oZu0NYF3ls9giSNQgACA_ByqphOsuSKhJ1pLWIf8gXg'
I will get the following json:
{
    "count": 3,
    "next": null,
    "previous": null,
    "results": [
        {
            "id": "a3e2d2dc-9f30-4a00-99e1-ca79a07aa792",
            "message": "message 3",
            "type": 0,
            "extraData": null,
            "isRead": false,
            "createdAt": "2021-08-11T16:11:56.926778Z",
            "updatedAt": "2021-08-11T16:11:56.926849Z",
            "refChat": "66fdac13-79ff-4d0f-a0f2-7001708f51d5",
            "author": "3cde3f7e-261e-4ebb-8437-fa4c27d35bf0"
        },
        {
            "id": "1ac78684-9cde-44ab-ab0a-dc393ba80631",
            "message": "message 2",
            "type": 0,
            "extraData": null,
            "isRead": false,
            "createdAt": "2021-08-11T16:11:45.103939Z",
            "updatedAt": "2021-08-11T16:11:45.104027Z",
            "refChat": "66fdac13-79ff-4d0f-a0f2-7001708f51d5",
            "author": "3cde3f7e-261e-4ebb-8437-fa4c27d35bf0"
        },
        {
            "id": "6cefd678-ba0c-4531-80a3-22aed289b51b",
            "message": "message 1",
            "type": 0,
            "extraData": null,
            "isRead": false,
            "createdAt": "2021-08-11T16:11:31.888809Z",
            "updatedAt": "2021-08-11T16:11:31.888915Z",
            "refChat": "66fdac13-79ff-4d0f-a0f2-7001708f51d5",
            "author": "3cde3f7e-261e-4ebb-8437-fa4c27d35bf0"
        }
    ]
}
Let’s create a new message.ts file in our models directory of our ionic application:
export class Message {
    id:string;
    message:string;
    type:number;
    extraData:any;
    isRead:boolean;
    refChat:string;
    author:string;
    createdAt : Date;
    updateAt : Date;

    constructor() {

    }

    initWithJSON(json) : Message{
      for (var key in json) {

            this[key] = json[key];

      }
      return this;
    }
}
With that class, we will be able to convert our api json response to a typescript message object.
You may wonder why i’m getting the message list from the most recent to the oldest one. It is because on a chat screen, we always display the last message to the end of the screen (bottom) and if scrolling to the top, at some point the view will need to retrieved previous messages (if exists).
To know if we have previous messages, we will use the next variable of the API response and when calling the next url, we will get a list of previous messages.
{
    "count": 3,
    "next": null,
    "previous": null,
    "results":
I just created 3 messages with the Django Admin so the next parameter is null.
By default we set the Django rest pagination at 20 items in our settings.py backend file:
REST_FRAMEWORK = {
'DEFAULT_AUTHENTICATION_CLASSES': (
   'rest_framework_simplejwt.authentication.JWTAuthentication',
),
'DEFAULT_FILTER_BACKENDS': (
    'django_filters.rest_framework.DjangoFilterBackend',
    'rest_framework.filters.OrderingFilter',
),
'DEFAULT_RENDERER_CLASSES': (
    'rest_framework.renderers.JSONRenderer',
    'rest_framework.renderers.BrowsableAPIRenderer',
),
'DEFAULT_PAGINATION_CLASS': 'rest_framework.pagination.PageNumberPagination',
'PAGE_SIZE': 20,
}
Let’s modify our api-service.service.ts file to add the message API:
 getMessage(refChat,page) {
    const options = {
      headers: new HttpHeaders({
        'Content-Type': 'application/json'
      })
    };
    let url = this.getMessageUrl+"?refChat="+refChat+"&page="+page
    return Observable.create(observer => {
      this.http.get(url, options)
        .pipe(retry(1))
        .subscribe(res => {
          this.networkConnected = true
          observer.next(res);
          observer.complete();
        }, error => {
          observer.next(false);
          observer.complete();
          console.log(error);// Error getting the data
        });
    });
  }
and don’t forget to declare the url:
getMessageUrl : string = ''and
private initUrls() {
    // ================ AUTHENTIFICATION METHODS ====================
    this.getLoginUrl = this.virtualHostName + "auth/jwt/create/"
    this.getCreateUserUrl = this.virtualHostName + "auth/users/"
    this.getResetPwdUrl = this.virtualHostName + "auth/users/reset_password/"
    this.getRefreshTokenUrl = this.virtualHostName + "auth/jwt/refresh/"
    this.getMeUrl = this.virtualHostName + "auth/users/me/"
    // =================================================================

    this.getUserUrl = this.virtualHostName + this.apiPrefix + "/user/"
    this.getSearchUserUrl = this.virtualHostName + this.apiPrefix + "/searchUser/"
    this.getCreateChatUrl = this.virtualHostName + this.apiPrefix + "/createChat/"
    this.getChatUrl = this.virtualHostName + this.apiPrefix + "/chat/"
    this.getMessageUrl = this.virtualHostName + this.apiPrefix + "/message/"
  }
Then in our chat-page.page.ts file:
 loadChat(page){
    if (this.apiService.networkConnected){
      this.apiService.showLoading().then(()=>{
        this.apiService.getMessage(this.chat.id,page).subscribe((list)=>{
          this.apiService.stopLoading()
          if (list) {
            let count = list["count"]
            if (count > 0) {
              //Iterate existing message
              for (let aMessage of list["results"]) {
                let theMessage = new Message().initWithJSON(aMessage)
                console.log(aMessage)
                this.messages.push(theMessage)
              }

            }
          }
        })
      })
    }
    else{
      this.apiService.showNoNetwork()
    }
  }
The page parameter will be used for the pagination. We can call this method once we had get and set the chat variable :
export class ChatPagePage implements OnInit {

  chat : Chat;
  username : string =''
  myUser : User
  otherUser : User
  messages = [

  ]
  messageToSend = ""
  currentPage=1

  constructor(public apiService:ApiserviceService,
    public userManager:UserManagerServiceService,
    public router: Router,
    public route:ActivatedRoute) {

    this.route.queryParams.subscribe(params => {
      if (this.router.getCurrentNavigation().extras.state) {
        this.chat = this.router.getCurrentNavigation().extras.state.chat;
        console.log(this.chat)
        if (this.chat.fromUser.id==this.userManager.currentUser.id){
          this.myUser = this.chat.fromUser
          this.otherUser = this.chat.toUser
        }
        else{
          this.myUser = this.chat.toUser
          this.otherUser = this.chat.fromUser
        }
        this.username = this.otherUser.first_name+" "+this.otherUser.last_name
        this.messages = []
        this.loadChat(this.currentPage)
      }
      else{
        //Return home
        this.router.navigateByUrl("/home")
      }
    });
  }
and we can adapt our chat-page.page.html file to our new message json:
    <ion-list>
    <div *ngFor="let message of messages">
        <div class="chat">
      <div [class]="message.author=== myUser.id ? 'messageFromMe' : 'messageFromOther'">
        <span>
          {{message.message}}
        </span>
        <span class="timestamp">
          {{ message.createdAt | date:'HH:mm' }}
          <ion-icon name="checkmark-done-circle-outline" *ngIf="message.author === myUser.id && message.isRead"></ion-icon>
          <ion-icon name="ellipse-outline" *ngIf="message.author === myUser.id && !message.isRead"></ion-icon>
        </span>
      </div>
        </div>
    </div>
    </ion-list>
The page displayed will look like this:

As we can see the messages are not in the correct order in the view. This is because of our ordering in our API. The trick will be to reverse the element of the list with the reverse() method of an array. Updated code is :
loadChat(page){
    if (this.apiService.networkConnected){
      this.apiService.showLoading().then(()=>{
        this.apiService.getMessage(this.chat.id,page).subscribe((list)=>{
          this.apiService.stopLoading()
          if (list) {
            let count = list["count"]
            if (count > 0) {
              // Need to reverse values of API message list (oldest to recent)
              let arrayToReverse = list["results"]
              let finalListe =arrayToReverse.reverse()
              //Iterate existing message
              for (let aMessage of finalListe) {
                let theMessage = new Message().initWithJSON(aMessage)
                console.log(aMessage)
                this.messages.push(theMessage)
              }
            }
          }
        })
      })
    }
    else{
      this.apiService.showNoNetwork()
    }
  }
Now result will be better:

Dealing with pagination
Because we will need lot more messages, we can create a python script (on backend) to create fake messages for us, let’s call it createFakeMessages.py
import os
os.environ.setdefault("DJANGO_SETTINGS_MODULE", "chattuto.settings")
import django
django.setup()
from faker import factory, Faker
from chat.models import Chat,Message
from model_bakery.recipe import Recipe, foreign_key

fake = Faker()
for i in range(100):
    from random import randrange
    import time
    from datetime import datetime
    randomNumber = randrange(10)
    message = Message()
    message.refChat_id="66fdac13-79ff-4d0f-a0f2-7001708f51d5"
    print(randomNumber)
    if randomNumber<=5:
        #myself
        message.author_id="3cde3f7e-261e-4ebb-8437-fa4c27d35bf0"
    else:
        #the other user
        message.author_id = "fb261053-d336-4a9b-9bcc-d206ac4b7753"
    message.isRead=False
    now = datetime.now()  # current date and time
    # Add to texte for better debug purpose
    message.message = fake.sentence(nb_words=10)+":"+now.strftime("%H:%M:%S")
    message.save()
    # sleep a little to have different createdAt
    time.sleep(1)
You need to adapt this script with your own refChat_id
To have the author of the message being myself or the other user, i use a random number and based on value between 0 and 10, i set the author_id with my own user_id or with the other_user_id
To generate a message i use fake.sentence and add it the current time, which will help us to visualize more easily on chat screen, if messages are order properly.
Finally i sleep 1 seconde between each message generation to avoid having the same createdAt value
You can get the ids using the Django admin.
Run the script with:
python createFakeMessage.pyOnce the messages are generated, we can try again our application. Our chat messages list will be displayed and the next parameter of the JSON reponse will be set with the next url to get other messages.
{
  count: 103,
  next: "http://127.0.0.1:8000/api/message/?page=2&refChat=66fdac13-79ff-4d0f-a0f2-7001708f51d5",
  previous: null,
  results: [ ... ]
}
Now that we have lot of messages, we need to scroll to see the last message in the list. We need to change that behaviour to automatically scroll to the bottom of the list.
In our html, we tagged the ion-content with the tag #content
<ion-content padding #content [scrollEvents]="true" (ionScroll)="checkScrolling($event)">In our typescript, like with our searchBar, we can access with the ViewChild instruction:
@ViewChild('content', { static: true }) content;and then after getting the messages list, we can scroll to the bottom like this:
 //Iterate existing message
let arrayToReverse = list["results"]
let finalListe =arrayToReverse.reverse()
for (let aMessage of finalListe) {
  let theMessage = new Message().initWithJSON(aMessage)
  this.messages.push(theMessage)
}
//Move to bottom
this.content.scrollToBottom(1000);
If user scrolls to the top, it means he wants to access previous historic messages, which means we need to load the previous messages from the backend (using the next url), then we need to add the messages to our chat list.
To check that the user is scrolling, i subscribed to ionScroll events, which call a method checkScrolling:
<ion-content padding #content [scrollEvents]="true" (ionScroll)="checkScrolling($event)">Let’s write the method:
  checkScrolling($event){
    if ($event.detail.scrollTop === 0) {
      //should load previous
      if (this.hasPrevious && !this.loadingPrevious){
        this.currentPage+=1
         this.loadChat(this.currentPage,true)
      }
      else{
        //No more previous
      }
    }
}- First we check if the user has scrolled to the top of the list: if ($event.detail.scrollTop === 0)
- Then if we have previous messages to load (based on the next variable) and not already loading the messages, we increment our currentPage variable and call again the loadChat method which has been modified to pass a second argument to know that the call is from this checkScrolling method.
So we need to modify our chat-page.page.ts file and declare these new variables:
 hasPrevious = false
 loadingPrevious = false
Then modify our loadChat method:
loadChat(page,fromScrolling){
    if (this.apiService.networkConnected){

        this.loadingPrevious = true
        this.apiService.getMessage(this.chat.id,page).subscribe((list)=>{
          this.loadingPrevious = false
          this.apiService.stopLoading()
          if (list) {
            console.log(list)
            let count = list["count"]
            let next = list["next"]
            if (next){
              this.hasPrevious=true
            }
            else{
              this.hasPrevious=false
            }
            if (count > 0) {
              //Iterate existing message
              let arrayToReverse = list["results"]
              let finalListe =arrayToReverse.reverse()
              let newList = []
              for (let aMessage of finalListe) {
                let theMessage = new Message().initWithJSON(aMessage)
                newList.push(theMessage)
              }
              //concat newList and existings messages
              let prov = newList.concat(this.messages)
              this.messages = prov
              this.content.scrollToBottom(1000);
            }
          }

      })
    }
    else{
      this.apiService.showNoNetwork()
}- Before loading messages from backend we set the this.loadingPrevious = true
- Once we have the results, we set the this.loadingPrevious = false
- Now that we have a list of previous messages, we need to reverse the list as we have done before.
- Then the final list of messages to display will be : the previous messages (just loaded) then the existing messages (that we have already fetched).
 let finalListe =arrayToReverse.reverse()
  let newList = []
  for (let aMessage of finalListe) {
      let theMessage = new Message().initWithJSON(aMessage)
      newList.push(theMessage)
  }
  //concat newList and existings messages
  let prov = newList.concat(this.messages)
  this.messages = prov
But now we have a problem with the this.content.scrollToBottom(1000); instruction. Because we fetched previous messages, constructed a new list of messages and then we scroll to the bottom of the chat, meaning that the user will see again the messages he already saw and he will need to scroll on top again…
This is not acceptable. We need to find the last message he saw before loading the new previous messages list and then scroll again to this last seen message:
 if (!fromScrolling){
    //Move to bottom
    this.content.scrollToBottom(1000);
  }
  else{
        //Need to scroll to last viewed message, wait for list refresh 100ms
        setTimeout(()=>{
            let listArray = this.list.nativeElement.children
            let itemToScroll = listArray[20]
            itemToScroll.scrollIntoView({behavior:'instant',block:'end'})
        },100)
}-
If the loadChat method is not called from the scrolling method, we can jump to the bottom of the list
- Otherwise we know that we just fetched some previous messages, we wait a little (100ms) that the ion-list refresh on the screen, then we get the elements of that list using the this.list.nativeElement.children instruction. We can get this list variable like this:
@ViewChild(IonList, { read:ElementRef }) list:ElementRef;- And then we scroll immediatly to last seen message:
let itemToScroll = listArray[20]
itemToScroll.scrollIntoView({behavior:'instant',block:'end'})
The trick is to use our pagination number. We know that we fetched messages 20 by 20 (our Django rest framework pagination). We also know that new loaded messages will be in first position on our list (from 0 to 19), so the last seen message is in position 20 (our pagination number) !
Now to be honest the user experience is not optimal while scrolling to the top, because we need to fetch messages using network. To improve the experience, we should save message history on local cache and then use it immediatly, meaning we could set the list once and jump directly to the end of the list.
Here is the final code of the chat-page.page.ts file:
import { Component, ElementRef, OnInit, ViewChild } from '@angular/core';
import { ActivatedRoute, Router } from '@angular/router';
import { IonList } from '@ionic/angular';
import { from } from 'rxjs';
import { Chat } from 'src/app/models/chat';
import { Message } from 'src/app/models/message';
import { User } from 'src/app/models/user';
import { ApiserviceService } from 'src/app/services/api-service.service';
import { UserManagerServiceService } from 'src/app/services/user-manager-service.service';

@Component({
  selector: 'app-chat-page',
  templateUrl: './chat-page.page.html',
  styleUrls: ['./chat-page.page.scss'],
})
export class ChatPagePage implements OnInit {
  @ViewChild('content', { static: true }) content;
  @ViewChild(IonList, { read:ElementRef }) list:ElementRef;

  chat : Chat;
  username : string =''
  myUser : User
  otherUser : User
  messages = [

  ]
  messageToSend = ""
  currentPage=1
  hasPrevious = false
  loadingPrevious = false

  constructor(public apiService:ApiserviceService,
    public userManager:UserManagerServiceService,
    public router: Router,
    public route:ActivatedRoute) {

    this.route.queryParams.subscribe(params => {
      if (this.router.getCurrentNavigation().extras.state) {
        this.chat = this.router.getCurrentNavigation().extras.state.chat;
        console.log(this.chat)
        if (this.chat.fromUser.id==this.userManager.currentUser.id){
          this.myUser = this.chat.fromUser
          this.otherUser = this.chat.toUser
        }
        else{
          this.myUser = this.chat.toUser
          this.otherUser = this.chat.fromUser
        }
        this.username = this.otherUser.first_name+" "+this.otherUser.last_name
        this.messages = []
        this.loadChat(this.currentPage,false)
      }
      else{
        //Return home
        this.router.navigateByUrl("/home")
      }
    });
  }

  ngOnInit() {
  }

  loadChat(page,fromScrolling){
    if (this.apiService.networkConnected){

        this.loadingPrevious = true
        this.apiService.getMessage(this.chat.id,page).subscribe((list)=>{
          this.loadingPrevious = false
          this.apiService.stopLoading()
          if (list) {
            console.log(list)
            let count = list["count"]
            let next = list["next"]
            if (next){
              this.hasPrevious=true
            }
            else{
              this.hasPrevious=false
            }
            if (count > 0) {
              //Iterate existing message
              let arrayToReverse = list["results"]
              let finalListe =arrayToReverse.reverse()
              let newList = []
              for (let aMessage of finalListe) {
                let theMessage = new Message().initWithJSON(aMessage)
                newList.push(theMessage)
              }
              //concat newList and existings messages
              let prov = newList.concat(this.messages)
              this.messages = prov
              if (!fromScrolling){
                  //Move to bottom
              this.content.scrollToBottom(1000);
              }
              else{
                //Need to scroll to last viewed message, wait for list refresh 100ms
                setTimeout(()=>{
                  let listArray = this.list.nativeElement.children
                  let itemToScroll = listArray[20]
                  itemToScroll.scrollIntoView({behavior:'instant',block:'end'})
                },100)
              }
            }
          }

      })
    }
    else{
      this.apiService.showNoNetwork()
    }
  }

  checkScrolling($event){
    if ($event.detail.scrollTop === 0) {
      //should load previous
      if (this.hasPrevious && !this.loadingPrevious){
        this.currentPage+=1
         this.loadChat(this.currentPage,true)
      }
      else{
        //No more previous
      }
    }
  }

}
There is only one missing feature to our list of messages. We need to display the date of the messages when it is different:
    <ion-list>
    <div *ngFor="let message of messages; let i = index">
        <div class="chat">
      <ion-row class="dateMessage" *ngIf="isDifferentDay(i)">
        <ion-badge>{{getMessageDate(i)}}</ion-badge>
      </ion-row>
      <div [class]="message.author=== myUser.id ? 'messageFromMe' : 'messageFromOther'">
        <span>
          {{message.message}}
        </span>
        <span class="timestamp">
          {{ message.createdAt | date:'HH:mm' }}
          <ion-icon name="checkmark-done-circle-outline" *ngIf="message.author === myUser.id && message.isRead"></ion-icon>
          <ion-icon name="ellipse-outline" *ngIf="message.author === myUser.id && !message.isRead"></ion-icon>
        </span>
      </div>
        </div>
    </div>
    </ion-list>
We add the dateMessage class to our chat-page.page.scss file:
.dateMessage {
    display: flex;
    flex-direction: column;
    align-self: center;
    margin-bottom: 10px;
    margin-top: 10px;
}
and in our typescript:
 isDifferentDay(messageIndex: number): boolean {

    if (messageIndex === 0) return true;

    const d1 = new Date(this.messages[messageIndex - 1].createdAt);
    const d2 = new Date(this.messages[messageIndex].createdAt);

    return d1.getFullYear() !== d2.getFullYear()
      || d1.getMonth() !== d2.getMonth()
      || d1.getDate() !== d2.getDate();
}

 getMessageDate(messageIndex: number): string {

   const wholeDate = new Date(this.messages[messageIndex].createdAt).toDateString();

   this.dateMessage = wholeDate.slice(0, wholeDate.length - 5);

   return this.dateMessage;

}- For each item of the list, we added an index
- Then we add a ion-row which is displayed only if the date changes.
And voila :

Managing isRead message status
To know if a message has been read, we will just suppose that it has been displayed in the chat to the concerned user. We can add :
for (let aMessage of finalListe) {
  let theMessage = new Message().initWithJSON(aMessage)
  if (theMessage.author!=this.myUser.id && theMessage.isRead==false){
    // I just read the message need to change the isRead to true

  }
  newList.push(theMessage)
}
And then we could use our API message to update the status of the message. But this will mean that if we have 20 messages unread (sent by the other user), we will do 20 Http query requests to update each messages !
This is a serious performance issue !
Instead we will do only ONE request with all the IDs to update. And to manage the list we will do:
let messagesIdToUpdate = []
for (let aMessage of finalListe) {
  let theMessage = new Message().initWithJSON(aMessage)
  if (theMessage.author!=this.myUser.id && theMessage.isRead==false){
      // I just read the message need to change the isRead to true
      messagesIdToUpdate.push(theMessage.id)
  }
  newList.push(theMessage)
}
if (messagesIdToUpdate.length>0){
  this.updateReadStatusForMessages(messagesIdToUpdate)
}
So now we need to write an API that will get this list of IDs and will update with only one query all messages.
First we will add the new route in the api/urls.py file :
url(r'^updateMessagesStatus/$', UpdateMessagesStatusView.as_view()),and will create the view in the api/views.py file:
class UpdateMessagesStatusView(APIView):
    def post(self, request, format=None):
        try:
            ids = request.data["messageIds"]
            Message.objects.filter(id__in=ids).update(isRead=True)
            newdict = {"status": "OK"}
            return JsonResponse(newdict)
        except Exception as e:
            logger.error(e)
            newdict = {"status": "KO"}
            return JsonResponse(newdict)
Now we add this method in our api-service.service.ts file (don’t forget to declare the getUpdateMessagesStatusUrl):
updateMessageStatus(listOfIds) {
    const options = {
      headers: new HttpHeaders({
        'Content-Type': 'application/json'
      })
    };

    let params = {
      "messageIds":listOfIds
    }

    return Observable.create(observer => {
      this.http.post(this.getUpdateMessagesStatusUrl, params, options)
        .pipe(retry(1))
        .subscribe(res => {
          this.networkConnected = true
          observer.next(res);
          observer.complete();
        }, error => {
          observer.next(false);
          observer.complete();
          console.log(error);// Error getting the data
        });
    });
  }
and in our chat-page.page.ts file we can call this method:
 updateReadStatusForMessages(listOfIds){
    if (this.apiService.networkConnected){
      this.apiService.updateMessageStatus(listOfIds).subscribe((done)=>{
        console.log(done)
      })
    }
  }
This is a huge performance improvment with simple code !
Chat with a user
It’s time to dive into the next big subject : sending real time messages to the other user using websocket !
If you remember on day two we learned how to implement a chat in Django using Django channels. The idea and process will be the same but from a Ionic application perspective !
Meaning we need to learn how to :
- Managing websockets with Ionic
- Websockets chat events listener
- Send / receive text messages
First we will create a new service to manage websockets:
ionic g service WebSocketService
mv src/app/web-socket-service.service.* src/app/services
And will edit the web-socket-service.service.ts with the code:
import { Injectable } from '@angular/core';
import { webSocket, WebSocketSubject } from "rxjs/webSocket";
import { BehaviorSubject, EMPTY, Observable, Subject, timer } from 'rxjs';
import { ApiserviceService } from './api-service.service';

@Injectable({
  providedIn: 'root'
})

export class WebSocketServiceService {
  RECONNECT_INTERVAL = 5000 // 5 seconds

  public messageReceived: BehaviorSubject<any> ;
  constructor(public apiService:ApiserviceService) { }

  myWebSocket: WebSocketSubject<any>;
  RETRY_SECONDS = 10;
  isConnected = true;

  processMessage(msg){
    console.log("=== Publish message received"+JSON.stringify(msg))
    this.messageReceived.next(msg)
  }

  connect(chat) {
    return new Promise(resolve => {
      let url = "ws://127.0.0.1:8000/ws/chat/"+chat.id+"/"
      try {
        this.isConnected=true
        this.myWebSocket  = webSocket(url)
        this.messageReceived = new BehaviorSubject<any>(null);
           // Called whenever there is a message from the server
        this.myWebSocket.subscribe(
          msg => {
            console.log('message received: ' + JSON.stringify(msg))
            this.processMessage(msg["message"])
          },
          err =>{
            this.isConnected=false;
            this.apiService.showError("Unable to connect to chat")
            console.log(err)
            },
          // Called if WebSocket API signals some kind of error
          () => {
            console.log('complete')
            this.isConnected=false;
        }
          // Called when connection is closed (for whatever reason)
       );
      resolve(true)

      } catch (error) {
        console.log(error)
        resolve(false)
     }
    })
  }

  sendMessage(params){
    this.myWebSocket.next(params);
  }

  close() {
    this.messageReceived.unsubscribe()
    this.myWebSocket.complete();
  }

}
The WebSocketService will have methods to :
- connect
- sendMessage to the chat
- process a received message
- disconnect
The variable public messageReceived: BehaviorSubject
To connect to a websocket with *Ionic**, it is really simple :
this.myWebSocket = webSocket(url)In day two tutorial, we define the url of our chat room to be : ‘ws/chat/(?P
This is why we hardcoded the url values like this:
let url = "ws://127.0.0.1:8000/ws/chat/"+chat.id+"/"To listen incoming events to our created socket, we can do like this:
 this.myWebSocket.subscribe(
      msg => {
            console.log('message received: ' + JSON.stringify(msg))
            this.processMessage(msg["message"])
      },
      err =>{
            this.isConnected=false;
            this.apiService.showError("Unable to connect to chat")
            console.log(err)
      },
      // Called if WebSocket API signals some kind of error
      () => {
            console.log('complete')
            this.isConnected=false;
      }
);
If a message is received, we called the processMessage method with the message, which will be transmitted to messageReceived subscribers:
this.messageReceived.next(msg)To send a message thru the websocket (aka to our Django backend) we can use:
sendMessage(params){
    this.myWebSocket.next(params);
}
So we can use this WebSocketService in our ChatPage to subscribe to messages received or to send message to the chat (aka the other user). Let’s add it to our chat-page.page.ts constructor method, and then once we have set our chat variable, we can connect to the websocket:
 constructor(public apiService:ApiserviceService,
    public userManager:UserManagerServiceService,
    public router: Router,
    public route:ActivatedRoute,
    private webSocketService:WebSocketServiceService) {

    this.route.queryParams.subscribe(params => {
      if (this.router.getCurrentNavigation().extras.state) {
        this.chat = this.router.getCurrentNavigation().extras.state.chat;
        // can connect to the chat websocket
        this.webSocketService.connect(this.chat)

        if (this.chat.fromUser.id==this.userManager.currentUser.id){
          this.myUser = this.chat.fromUser
          this.otherUser = this.chat.toUser
        }
        else{
          this.myUser = this.chat.toUser
          this.otherUser = this.chat.fromUser
        }
        this.username = this.otherUser.first_name+" "+this.otherUser.last_name
        this.messages = []
        this.loadChat(this.currentPage,false)
      }
      else{
        //Return home
        this.router.navigateByUrl("/home")
      }
    });
  }
To manage the disconnect, we will implement the ngOnDestroy method:
export class ChatPagePage implements OnInit,OnDestroy {which is called automatically when a view is destroyed in memory, and will close the websocket connection:
ngOnDestroy(){
    console.log("=== Disconnecting websocket ====")
    this.webSocketService.close()
}
Before subscribing to incoming message, we need to check that the socket is connected:
 // can connect to the chat websocket
this.webSocketService.connect(this.chat)
if (this.webSocketService.isConnected){
  this.webSocketService.messageReceived.subscribe((message)=>{
     if (message){
              console.log("WS Received message ")
              console.log(message)
      }
  })
}
To send a message, we declared a sendMessage() method into our html. We can now implement it:
sendMessage(){
    if (this.webSocketService.isConnected){
       //create the expected json message
      let newMessage = {
        "author" : this.myUser.id,
        "refChat" : this.chat.id,
        "message" : this.messageToSend,
        "type" : 0,
        "extraData": ""
      }
      this.webSocketService.sendMessage(newMessage)
    }
  }
messageToSend is the text the user is typing into it’s chat input box.
We need to construct the JSON that our server is expecting as we have seen in tutorial day two:
{
refChat : refChat
author : refUser
message : message
type : 0
extraData : ""
}
Now you can try again the application and try our chat page, you should see the message: Unable to connect to chat.
This is because we declared in our backend ChatConsumer method, that the user should be authentificated:
class ChatConsumer(WebsocketConsumer):
    def connect(self):
        try:
            self.room_name = self.scope['url_route']['kwargs']['room_name']
            chat = Chat.objects.get(id=self.room_name)
            self.room_group_name = 'chat_%s' % str(chat.id)
            # Join room group
            async_to_sync(self.channel_layer.group_add)(
                self.room_group_name,
                self.channel_name
            )

            self.accept()
        except Chat.DoesNotExist as e:
            print(e)
            return
Unfortunatly it seems impossible to specify custom headers when opening a websocket connection neither with RxJS nor with plain JavaScript / DOM API. So we need to remove this check:
class ChatConsumer(WebsocketConsumer):
    def connect(self):
        try:
            user = self.scope['user']
            print("=== user %s" % user)
            if str(user)=="AnonymousUser":
                print("==Not authorized")
                return
            self.room_name = self.scope['url_route']['kwargs']['room_name']
            chat = Chat.objects.get(id=self.room_name)
            self.room_group_name = 'chat_%s' % str(chat.id)
            # Join room group
            async_to_sync(self.channel_layer.group_add)(
                self.room_group_name,
                self.channel_name
            )

            self.accept()
        except Chat.DoesNotExist as e:
            print(e)
            return
Now you should be able to go to the ChatPage without websocket issue.
To test the websocket, first we can use the page that we developped in tutorial day two:
http://127.0.0.1:8000/chat/66fdac13-79ff-4d0f-a0f2-7001708f51d5/

We just need to setup the correct chat id in the url. We can get this chat id from our javascript console log of our Ionic application. And then if we sent a message from the web interface, we can check that this message is received from our Ionic application console log:
=== Publish message received"message sent from web interface"
chat-page.page.ts:49 WS Received message
chat-page.page.ts:50 message sent from web interface
We can also verify that if we go back to our HomePage, the websocket will be closed by our ngDestroy method:
=== Disconnecting websocket ====As final step, we need to test sending messages from our Ionic application to another user on Ionic application too. So you will need to create/register another user, and test with two users (meaning two devices) in parallel. Like if you are simulating a chat.
You can do this by testing on a simulator (ios or android) and on your browser (Opera, firefox,…) or you can use two different browser such as Opera and Chrome or Safari and firefox , or … You got the point…
On one device this will be your first user and on the second device, this will be your second user.
If you are not sure to understand, please refer to this screenshot:
I have registered a User1 and User2 for demo purpose. Then i created a chat between the two users


And now if you write a message in User1 and click to send the message, you should see in your javascript console log (of both users aka browsers), the message sent:
WS Received message
chat-page.page.ts:50 Hi Julien, how are you ?
Using the Django Admin you should be able to see the message, meaning it has been saved correctly in the database.
Great!!! our websocket is working perfectly between users and now we have to fix some code.
- When sending a message, we can reset the input box value:
 sendMessage(){
    if (this.webSocketService.isConnected){
      //create the expected json message
      let newMessage = {
        "author" : this.myUser.id,
        "refChat" : this.chat.id,
        "message" : this.messageToSend,
        "type" : 0,
        "extraData": ""
      }
      this.webSocketService.sendMessage(newMessage)
      this.messageToSend=""
    }
}- Right now we received the message as a string but we need a Message object. To do so, we just need to update our consumers.py file and pass the JSON received instead of the text message:
    def receive(self, text_data):
        data_json = json.loads(text_data)
        print("===Received")
        print(data_json)
        user = self.scope['user']
        print("=== user %s"%user)
        message = data_json['message']
        # save message to database
        self.new_message(data_json)
        # Send JSON to room group
        async_to_sync(self.channel_layer.group_send)(
            self.room_group_name,
            {
                'type': 'chat_message',
                'message': data_json
            }
)-
Now we can modify our webSocket.messageReceived event to create a Message object from the JSON, and add it to the list of messages:
this.webSocketService.messageReceived.subscribe((message)=>{
if (message){
  console.log("WS Received message ")
  console.log(message)
  let theMessage = new Message().initWithJSON(message)
  theMessage.createdAt = new Date()
  this.messages.push(theMessage)
  // scroll to bottom to see the message
  this.content.scrollToBottom(1000);
}
})
We also initialize the createdAt to the current date, because the JSON doesn’t contains this information.
- We can also set the isRead to True if the message received not coming from our own user:
this.webSocketService.messageReceived.subscribe((message)=>{
    if (message){
      console.log("WS Received message ")
      console.log(message)
      let theMessage = new Message().initWithJSON(message)
      theMessage.createdAt = new Date()
      this.messages.push(theMessage)
      // scroll to bottom to see the message
      this.content.scrollToBottom(1000);
      let messagesIdToUpdate = []
      if (theMessage.author!=this.myUser.id && theMessage.isRead==false){
         // I just read the message need to change the isRead to true
         messagesIdToUpdate.push(theMessage.id)
         this.updateReadStatusForMessages(messagesIdToUpdate)
      }
    }
  })
Ok we now have a functional chat between two users. Let’s see how to improve it, by adding attachment functionnalities.
Improve chat by sending geolocation or pictures
As improvment, we will let the user send it’s google map geolocation or an image in the chat.
Let’s first modify the chat-page.page.html file to add these functionnalities:
  <ion-toolbar color="light">
   <ion-row class="ion-align-items-center attachments">
     <ion-col size="6">
      <ion-textarea   [(ngModel)]="messageToSend" autocapitalize="sentence"
      placeholder="Type a message" spellcheck="true" color="dark" autoGrow="true"
      rows="1"></ion-textarea>
    </ion-col>
    <ion-col size="2" >
      <ion-button (click)="clicGeoloc()" color="dark" shape="round" fill="clear">
        <ion-icon name="location-outline"></ion-icon>
      </ion-button>
    </ion-col>
    <ion-col size="2">
      <ion-button (click)="clicCamera()" color="dark" shape="round" fill="clear">
        <ion-icon name="camera-outline"></ion-icon>
      </ion-button>
     </ion-col>
     <ion-col size="2">
      <ion-button   (click)="sendMessage()" shape="round" fill="clear" [disabled]="messageToSend === ''">
        <ion-icon name="paper-plane-outline"></ion-icon>
      </ion-button>
     </ion-col>
   </ion-row>
  </ion-toolbar>
and chat-page.page.scss file:
.attachments{
    ion-icon {
        font-size: 20px;

    }
}
Our new toolbar will render like this:

Dealing with attachment : Geolocation
To send our location to the other user, we will need to install the Capacitor Geolocation plugin.
npm install @capacitor/geolocation
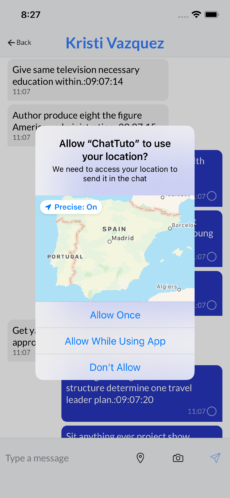
npx cap syncPlease notice you will need to configure the Info.plist file of your code project, to ask permission.
<key>NSLocationAlwaysAndWhenInUseUsageDescription</key>
<string>We need to access your location to send it in the chat</string>
<key>NSLocationWhenInUseUsageDescription</key>
<string>We need to access your location to send it in the chat</string>
This will be used to show and ask the user if he accepts to be geolocalized:
Then to use it, we will import it in our code:
import { Geolocation } from '@capacitor/geolocation';Because we can use this application on our browser too (as a progressive web app), we need to check the platform on which the user is (browser or iOS/Android):
constructor(public apiService:ApiserviceService,
    public userManager:UserManagerServiceService,
    public router: Router,
    public route:ActivatedRoute,
    private webSocketService:WebSocketServiceService,
    public platform:Platform) {
Then we can write our clicGeoloc method:
 async clicGeoloc(){
    if (this.platform.is("capacitor")){
      await Geolocation.checkPermissions().then((status)=>{
        if (status.location=="granted"){
          this.getCurrentLocation()
        }
        else{
          Geolocation.requestPermissions().then((status)=>{
            if (status.location=="granted"){
              this.getCurrentLocation()
            }
          })
        }
      })
    }
    else{
      // Get location from browser
      if (navigator.geolocation) {
        navigator.geolocation.getCurrentPosition(
          position => {
            console.log("============= POSITION  ================");
            console.log(position)
            let latitude = position.coords.latitude;
            let longitude = position.coords.longitude;
            this.sendLocationMessage(latitude,longitude)
          },
          error => {
            this.apiService.showError("Geolocation unavailable !")
          }
        );
      }
    }

}- We first the Platform the user is using
- If the platform is capacitor (ios/android), then we need to check if we have the permission to request the geolocation of the user, otherwise we need to request the permission.
- Then we can call a method to get the current location of the user.
- If the user is on a browser (navigator), then we can use the browser WebAPI to get the current position, and then we can send our geolocated message.
First let’s write the method to get the current location with Capacitor:
async getCurrentLocation(){
    const position = await Geolocation.getCurrentPosition();
    if (position) {
      let latitude = position.coords.latitude;
      let longitude = position.coords.longitude;
      this.sendLocationMessage(latitude,longitude)
    }
    else{
      this.apiService.showError("Geolocation unavailable !")
    }
  }
The plugin will return a JSON with different information such as the latitude and longitude:
{"coords":
  {
    "latitude":31.046050999999999,
    "accuracy":5,
    "heading":-1,
    "altitudeAccuracy":-1,
    "altitude":0,
    "longitude":-34.851612000000003,
    "speed":-1
  },
  "timestamp":1628836078582
}
and now let’s focus on sending a message to our chat, with the geolocation information. We will construct the same Message json as before, but this time we will use and set the type and extraData parameters:
sendLocationMessage(latitude,longitude){
    let extraData = Number(latitude).toString()+","+Number(longitude).toString()
    this.sendMessageWithArg(1,extraData)
}
We just need to refactor a little bit our code:
 sendMessage(){
    this.sendMessageWithArg(0,"")
}

sendMessageWithArg(type,extraData){
    if (this.webSocketService.isConnected){
      //create the expected json message
      let newMessage = {
        "author" : this.myUser.id,
        "refChat" : this.chat.id,
        "message" : this.messageToSend,
        "type" : type,
        "extraData": extraData
      }
      this.webSocketService.sendMessage(newMessage)
      this.messageToSend=""
    }
}
Our Django backend doesn’t need any modifications because we already set these values in the database when received, in our consumers.py file :
    def new_message(self,data):
        message = Message()
        message.refChat_id = data["refChat"]
        message.message = data["message"]
        message.author_id = data["author"]
        message.isRead = False
        message.type = data["type"]
        message.extraData = data["extraData"]
        message.save()
And if you remember we created the Message model with:
 msg_type = (
        (0, "TEXT"),
        (1, "GEOLOC"),
        (2, "PHOTO"),
    )
    type = models.IntegerField(choices=msg_type, default=0)
which now make sense. type==1 means it is a geolocated message and the extraData contains the information.
Now we just need to update our chat-page.page.html file to check if the type is 0 (message) or 1 (geolocation):
 <div [class]="message.author=== myUser.id ? 'messageFromMe' : 'messageFromOther'">
        <span *ngIf="message.type==0">
          {{message.message}}
        </span>
        <span *ngIf="message.type==1" class="chatimage">
          <ion-img src="assets/imgs/chatlocate.png"></ion-img>
        </span>
        <span class="timestamp">
          {{ message.createdAt | date:'HH:mm' }}
          <ion-icon name="checkmark-done-circle-outline" *ngIf="message.author === myUser.id && message.isRead"></ion-icon>
          <ion-icon name="ellipse-outline" *ngIf="message.author === myUser.id && !message.isRead"></ion-icon>
        </span>
      </div>
and scss:
.chatimage{
    max-width: 100px;
}
If the type is 0, we display the text message, otherwise we display an image (located in the assets/imgs/ folder):

Now we will add the possibility to click on the image, to launch Google Maps within a browser to show position on a map.
And this time we will use Capacitor Browser plugin to do so. Let’s install it:
npm install @capacitor/browser
npx cap sync
Now we use it :
import { Browser } from '@capacitor/browser';Modify the HTML to add the click :
<ion-img src="assets/imgs/chatlocate.png" (click)="showLocation(message)"></ion-img>and create the showLocation(message) method:
 async showLocation(message){
    let extraData = message.extraData
    if (extraData){
      let tokens = extraData.split(",")
      console.log(extraData)
      let lat = tokens[0]
      let lon = tokens[1]
      let urlGoogleMap = "https://maps.google.com/?q=" + lat + "," + lon
      await Browser.open({ url: urlGoogleMap });
    }

  }
Dealing with attachment : Picture
To send picture attachment, we will use same technique as before except the type parameter will be 2, and the extraData will contain the url of our image.
To choose or take an image, we will use the Capacitor Camera plugin, so let’s install it:
npm install @capacitor/camera
npx cap sync
As before, the iOS requires the following usage description be added and filled out for your app in Info.plist: NSCameraUsageDescription, NSPhotoLibraryAddUsageDescription and NSPhotoLibraryUsageDescription.
For Android, the AndroidManifest.xml will require:
<uses-permission android:name="android.permission.READ_EXTERNAL_STORAGE"/>
<uses-permission android:name="android.permission.WRITE_EXTERNAL_STORAGE" />
Now we import the plugin:
import { Camera, CameraResultType } from '@capacitor/camera';Easy part, we can update the HTML to display the image which will be in the extraData parameter:
 <span *ngIf="message.type==2" class="chatimage">
    <ion-img [src]="message.extraData" (click)="showImage(message)"></ion-img>
</span>
Now we need to create the clicCamera() method, which will let the user chooses his photo and then add the image to the chat.
 async clicCamera(){
    const image = await Camera.getPhoto({
      quality: 90,
      allowEditing: true,
      resultType: CameraResultType.Base64
    });
    if (image){
      //Send image to server
      let extraData =<code>data:image/${image.format}</code>+";base64,"+image.base64String
       this.sendMessageWithArg(2,extraData)
    }
  }
The trick here is to set the extraData parameter with the content of the image as a base64 string !
Before testing our application again, we need to modify our Django Message Model and replace the:
extraData = models.CharField(default='', null=True, blank=True, max_length=255)which is a CharField which is too short to contains a base64 string by:
extraData = models.TextField(null=True, blank=True)Now we need to launch a Django migration using python manage.py makemigrations and python manage.py migrate:
python manage.py makemigrations
Migrations for 'chat':
  chat/migrations/0002_auto_20210813_0804.py
    - Alter field extraData on message
(venv) christophesurbier@MacBook-Air-de-christophe chattuto % python manage.py migrate
Operations to perform:
  Apply all migrations: admin, auth, chat, contenttypes, sessions
Running migrations:
  Applying chat.0002_auto_20210813_0804... OK
And voilà ! We can try the application, select or take an image (iOS/Android only) and send it to the chat:

As an exercice, you could try to create the showImage(message) method and use the Capacitor PhotoViewer plugin to show the image on fullscreen.
More rapid and easy, i will use this NgxIonicImageViewer plugin:
npm install --save ngx-ionic-image-viewerThen we need to modify our app.module.ts file to import it:
import { Injectable, NgModule } from '@angular/core';
import { BrowserModule } from '@angular/platform-browser';
import { RouteReuseStrategy } from '@angular/router';

import { IonicModule, IonicRouteStrategy } from '@ionic/angular';
import { AppComponent } from './app.component';
import { AppRoutingModule } from './app-routing.module';
import { HttpClient, HttpClientModule, HttpEvent, HttpHandler, HttpInterceptor, HttpRequest, HTTP_INTERCEPTORS } from '@angular/common/http';
import { InAppBrowser } from '@ionic-native/in-app-browser/ngx';
import { IonicStorageModule } from '@ionic/storage-angular';
import { TokenInterceptor } from './services/token.interceptor';
import { NgxIonicImageViewerModule } from 'ngx-ionic-image-viewer';

@NgModule({
  declarations: [AppComponent],
  entryComponents: [],
  imports: [
    IonicStorageModule.forRoot(),
    BrowserModule,
    HttpClientModule,
    IonicModule.forRoot(),
    AppRoutingModule,
    NgxIonicImageViewerModule
  ],
  providers: [
    InAppBrowser,
    { provide: RouteReuseStrategy, useClass: IonicRouteStrategy },
    { provide: HTTP_INTERCEPTORS, useClass: TokenInterceptor, multi: true }
  ],
  bootstrap: [AppComponent],
})
export class AppModule {}
then we also need to import it into our chat-page.module.ts file:
import { NgModule } from '@angular/core';
import { CommonModule } from '@angular/common';
import { FormsModule } from '@angular/forms';

import { IonicModule } from '@ionic/angular';

import { ChatPagePageRoutingModule } from './chat-page-routing.module';

import { ChatPagePage } from './chat-page.page';
import { NgxIonicImageViewerModule } from 'ngx-ionic-image-viewer';
@NgModule({
  imports: [
    CommonModule,
    FormsModule,
    IonicModule,
    NgxIonicImageViewerModule,
    ChatPagePageRoutingModule
  ],
  declarations: [ChatPagePage]
})
export class ChatPagePageModule {}
and then we can use it as a directive as simple as :
<ion-img ionImgViewer [src]="message.extraData"></ion-img>We just added the ionImgViewer directive to our image.
Now you can click the image, it will open on fullscreen. We don’t need the showImage() anymore !
Please notice the scrollToBottom instruction that we set after initializing the message list, will not always scroll exactly to bottom with image messages. I modified the code to use a timer to wait a little bit that the content view refreshed and then i ask for a scrollToBottom :
if (!fromScrolling){
   //Move to bottom
  setTimeout(()=>{
       this.content.scrollToBottom(1000);
  },200)
}
The result is a little bit better but not optimal. I’m not sure what the problem is, may be it is a ionic bug.
Managing user presence with online/offline
In a chat application, it would be nice to know if the other user is online or not. We will add this feature.
First let’s modify our User model, to add this information:
class User(AbstractBaseUser, PermissionsMixin):
    id = models.UUIDField(primary_key=True, default=uuid.uuid4, editable=False)
    email = models.EmailField(_('email address'), unique=True)
    first_name = models.CharField(_('first name'), max_length=30, blank=True)
    last_name = models.CharField(_('last name'), max_length=30, blank=True)
    date_joined = models.DateTimeField(_('date joined'), auto_now_add=True)
    is_active = models.BooleanField(_('active'), default=True)
    is_staff = models.BooleanField(_('active'), default=True)
    avatar = models.ImageField(upload_to='avatars/', null=True, blank=True)
    lastConnexionDate = models.DateTimeField(null=True, blank=True)
    valid = models.BooleanField(default=True)
    online = models.BooleanField(default=False)
Then we can launch migrations:
python manage.py makemigrations
python manage.py migrate
We can update user.ts file to add the online fields:
export class User {
    fcmdevice:any;
    password:string;
    last_login:string;
    is_superuser:any;
    id:any;
    email:string;
    first_name:string;
    last_name:string;
    date_joined:Date;
    is_active:boolean;
    is_staff:boolean;
    avatar:string;
    groups:any;
    user_permissions:any;
    lastConnexionDate : Date;
    valid:boolean;
    backgroundColor : string
    online : boolean;
Remember our setActiveAndLastDate and setInactive methods in our app.component.ts file ? We can now modify these methods to set this new online parameter:
setActiveAndLastDate(user: User) {
    if (this.apiService.networkConnected) {
      this.apiService.showLoading().then(() => {
        this.apiService.showLoading().then(() => {
          let params = {
            "online": true,
            "lastConnexionDate": new Date()
          }
          this.apiService.updateUser(user.id, params).subscribe((done) => {
            this.apiService.stopLoading()
          })
        })
      })
    }
  }

setInactive(user: User) {
    if (this.apiService.networkConnected) {
      this.apiService.showLoading().then(() => {
        let params = {
          "online": false
        }
        this.apiService.updateUser(user.id, params).subscribe((done) => {
          this.apiService.stopLoading()
        })
      })
    }
  }
This methods are called when a user enters or leaves the application, which is perfect to know if a user is online or not.
We need to modify our ChatUserSerializer and SearchUserSerializer to return this online information:
class ChatUserSerializer(ModelSerializer):
    class Meta:
        model = User
        fields = ['id','first_name','last_name','online']

class SearchUserSerializer(ModelSerializer):
    class Meta:
        ref_name = "SearchUser"
        model = User
        fields = ["id","first_name","last_name","online"]
Now if you try the application again, when getting the chat list json, you should have the information about online for each user:
{
    "id": "e7344a76-5c3d-42b5-99ff-d1317fa2193e",
    "fromUser": {
        "id": "91314a6f-8f49-42d1-9eef-d653c326d0d0",
        "first_name": "user1",
        "last_name": "christophe",
        "online": true
    },
    "toUser": {
        "id": "b1efd0ec-96cd-4b05-8e38-def384ba436f",
        "first_name": "user2",
        "last_name": "julien",
        "online": false
    },
    "lastMessage":
}
Let’s modify our home-page.page.html, search user list to display the online information:
 <ion-item  *ngFor="let item of listOfUser">
    <div  [ngClass]="item.classonline"  [ngStyle]="{'background':item.backgroundColor}">

    </div>
    <ion-label class="username">{{item.first_name}} {{item.last_name}}</ion-label>
    <ion-button slot="end" (click)="createChat(item)" expand="block" fill="clear" shape="round">
         <ion-icon name="chatbubbles-outline"></ion-icon>
    </ion-button>
</ion-item>
and our chat list:
<ion-item  *ngFor="let chat of chatList" (click)="goToChat(chat)">
    <div [ngClass]="chat.classonline" [ngStyle]="{'background':chat.backgroundColor}">

    </div>
then we modify the home-page.page.scss file :
.image-profile-online{
    width: 2rem;
    height: 2rem;
    display: block;
    border-radius: 50%;
    border: 3px solid rgb(23, 247, 23);
    margin-right: 10px;
 }
 .image-profile-offline{
    width: 2rem;
    height: 2rem;
    display: block;
    border-radius: 50%;
    border: 3px solid red;
    margin-right: 10px;
 }
online users will be displayed with a green circle and offline user with a red one.
Finally we need to adapt our code to construct dynamically this classonline variable, which is very simple for the onSearchChange method:
 for (let item of data) {
    item["backgroundColor"] = this.getRandomColor()
    if (item.online){
        item["classonline"]="image-profile-online"
    }
    else {
        item["classonline"]="image-profile-offline"
    }
    this.listOfUser.push(item)
}
whereas on the loadExistingChat() method, the code is a little bit more complex since we first need determine which user in the json Chat is not ourself:
if (theChat.fromUser.id!=this.userManager.currentUser.id){
    if (theChat.fromUser.online){
        theChat["classonline"]="image-profile-online"
    }
    else {
        theChat["classonline"]="image-profile-offline"
    }
}
else{
    //Other
    if (theChat.toUser.online){
        theChat["classonline"]="image-profile-online"
    }
    else {
        theChat["classonline"]="image-profile-offline"
    }
}
As improvment, you could pass the online information to the ChatPage and display something in the header to show that the user is online (or not).
When a user logs or registers to our application, we should set him as online:
this.apiService.findUserWithQuery("?email="+email).subscribe((list) => {
  if (list) {
    let count = list["count"]
    console.log("Count " + count)
    if (count == 0) {
      this.apiService.showError('Identification failed ! No account found');
    }
    else {
      let result = list["results"][0]
      console.log(result)
      this.userManager.setUser(result).then((done) => {
         let params = {
              "online": true,
               "lastConnexionDate": new Date()
          }
          this.apiService.updateUser(this.userManager.currentUser.id, params).subscribe((done) => {

          })
          // Next screen
          console.log("===Can go to next screen")
          this.router.navigateByUrl('/home', { replaceUrl: true });
      })
    }
  }
let updateParams = {
"first_name": params.firstName,
"last_name": params.lastName,
"online":true,
"lastConnexionDate": new Date()
}
this.apiService.updateUser(this.userManager.currentUser.id, updateParams).subscribe((done) => {
console.log("resultat update ", done)
})How to refresh chat list home page with latest message ?
We need to fix some issues.
If you send a message or received a message from a user and go back to the home page, the chat list will not be aware of this new message (list was loaded before), so the screen will not be updated. Worst, if you received a new chat from a user, you will not be able to see it in the list !
One easy solution, could be to detect each time user enters the home page and refresh the list:
ionViewDidEnter(){
    this.loadExistingChat()
  }
Another solution would be to have a background thread getting the chat list each second (a polling system):
constructor(public apiService: ApiserviceService,
    public userManager: UserManagerServiceService,
    public router:Router) {
      this.loadExistingChat()
      this.taskBackground = setInterval(() => {
        this.launchBackgroundThread();
     }, 1000); //1secondes
  }

  ngOnInit() {
  }
  ngOnDestroy(){
    this.taskBackground.clearInterval()
  }

  ngAfterViewInit() {
    SplashScreen.hide()
  }

  launchBackgroundThread(){
    this.apiService.getChats().subscribe((list) => {
      console.log(list)
      if (list){
        let count = list["count"]
        if (count>this.chatList.length){
          //New chat refresh the list
          console.log("===new chat")
          this.chatList = []
          this.parseChatList(list)
        }
      }
    })
  }
and to avoid code duplication, we refactor to create a parseChatList method:
parseChatList(list){
    let count = list["count"]
    if (count > 0) {
      //Iterate existing chat
      for (let aChat of list["results"]) {
        let theChat = new Chat().initWithJSON(aChat)
        console.log(theChat)
        theChat["backgroundColor"] = this.getRandomColor()
        if (theChat.lastMessage.length > 0) {
          let lastmessage = theChat.lastMessage[0]
          let classMessage = 'messageUnread'
          if (lastmessage.isRead) {
            classMessage = "messageread"
          }
          theChat["classMessage"] = classMessage
        }
        if (theChat.fromUser.id!=this.userManager.currentUser.id){
          if (theChat.fromUser.online){
            theChat["classonline"]="image-profile-online"
          }
          else {
            theChat["classonline"]="image-profile-offline"
          }
        }
        else{
          //Other
          if (theChat.toUser.online){
            theChat["classonline"]="image-profile-online"
          }
          else {
            theChat["classonline"]="image-profile-offline"
          }
        }
        this.chatList.push(theChat)
      }

    }
  }

  loadExistingChat() {
    if (this.apiService.networkConnected) {
      this.isSearching = true

      this.chatList = []
      this.apiService.getChats().subscribe((list) => {
        if (list) {
          this.parseChatList(list)
        }
      })
    }
  }
With this solution if an incoming chat arrives, the list will refresh and we will be able to see it on the top of the list (because the backend orders by most recent one first).
Now we need to have a different approach for last message displayed. We will iterate our current chat list with the new one received, and check if last message are the same. If not, we can directly modify the chat last message element without refreshing the all list:
 launchBackgroundThread(){
    this.apiService.getChats().subscribe((list) => {
      console.log(list)
      if (list){
        let count = list["count"]
        if (count>this.chatList.length){
          //New chat refresh the list
          console.log("===nouveau chat")
          this.chatList = []
          this.parseChatList(list)
        }
        else{
          //check message
          for (let aChat of list["results"]) {
            let theChat = new Chat().initWithJSON(aChat)
            for (let chatDisplayed of this.chatList){
              if (chatDisplayed.id==theChat.id){
                let lastMessageDisplayed = chatDisplayed.lastMessage[0]
                let currentLastMessage = theChat.lastMessage[0]
                if (currentLastMessage && !lastMessageDisplayed){
                  chatDisplayed.lastMessage = theChat.lastMessage
                  console.log("==Replace last message",JSON.stringify(chatDisplayed.lastMessage))
                }
                else{
                  if (currentLastMessage.id!=lastMessageDisplayed.id){
                    //New incoming message replace in list
                    chatDisplayed.lastMessage = theChat.lastMessage
                    console.log("==Replace last message",JSON.stringify(chatDisplayed.lastMessage))
                  }
                }
              }
            }
          }
        }
      }
    })
  }
Another solution could be to use WebSocket again and develop a notification event system (as we have done for the chat himself). Or to use an external provider such as Pusher.com if you don’t want to spend time to develop realtime notifications.
The source code of this tutorial can be found on my Github repository.
Questions/Answers
- How to pass arguments to a ionic screen while navigating ?
Create a navigationExtras dictionnary with the fields/objects you want to pass then use the navigate method of the standard Angular router :
  const navigationExtras: NavigationExtras = { state : {
      chat : new Chat().initWithJSON(response) }
  };
this.router.navigate(['chat-page'], navigationExtras);- How to get an element value of in the Ionic Html page from your code ?
Tag the content in your HTML with # keyword and then use the @ViewChild angular instruction:
<ion-content padding #content [scrollEvents]="true" (ionScroll)="checkScrolling($event)">and
@ViewChild('content', { static: true }) content;
- What technology can we use to have realtime notifications ?
Websockets
To go further :
You can implement a new functionality : Showing in chat that other user is typing a message. You should have all the technical background to do it now.
-
listen for events on the chat input box
-
Send a new kind of event thru the websocket (like usertyping)
-
Modify the consumers.py file to receive and transmit this new event (PS: no need to save this information in database. This is not our usual Django model Message)
- Modify the code to subscribe to this kind of message (user is typing) and display something at the bottom of the chat list like a bubble with … as we can see in many other chat applications.